LordRusty
AH member
- Joined
- Jan 19, 2009
- Messages
- 32
- Reaction score
- 18
- Website
- wildlife.equineartistry.com
- Media
- 73
- Articles
- 4
Care of Your Mounted Trophy
By John Bellucci
After you bring your hard won trophy home from the taxidermist, and hang it in the special place you've had in mind for it ever since you bagged it... is that the end of the trail? I should say not!
The first thing you should know is how to properly hang your trophy head on the wall. Never grab, nor balance, or in any other way put your hand on the neck of the mounted head. Most hoofed game mammals have rather hollow hair -- not fur like most predatory species -- and the hair is susceptible to breakage. The horns, or antlers, are "Nature's Handle"... at least when it comes to a game head mount anyway! You can hold a horn or antler in one hand, and have the brisket resting on the other hand, then lift the trophy to hang on the wall.
Be sure you have a screw -- not a nail -- with a large, flat head, secured into a wall beam for maximum strength! Make sure it sticks out from the wall enough to catch the screw head securely under the hanger attached to the backboard of the mount.
After hanging the head, look it over for any hair that may have been disturbed during the hanging up process. If there is any, use a soft hairbrush to gently lay the hair back down. Be sure there are no other hairs, or dander, in the hairbrush that can be transferred to your nice clean mount!
The biggest thing all mounted trophies have in common is they tend to become dust collectors! Not because they are there -- per say -- but because the very nature of the hair and fur, tends to generate a static electric "field", which is an attractant for dust. Add to this any smoke in the air from cooking and you have even more added to the normal dust in the air. Regular, weekly dusting with a soft cloth, or one of those new Swiffer ® Dusters, will keep your hard won trophy looking new for years. Like anything of value in your home, your mounted trophies deserve and need regular care to maintain them and keep them looking in like new condition!
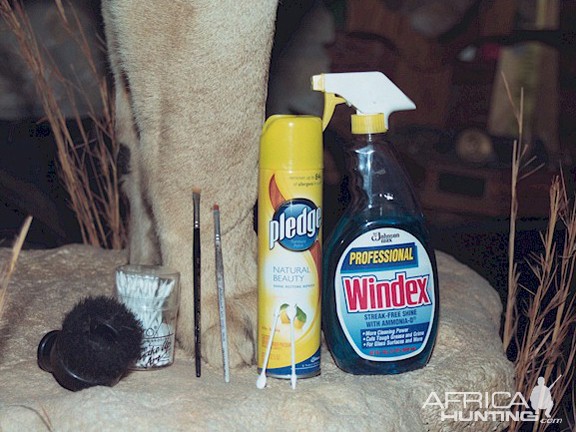
These are some of the items for cleaning those hard-earned trophies. Left to right: Round ‘Duster” brush attachment for a Shop Vac ®; Cosmetic makeup swab double-end applicators; flat Artist's brushes; Pledge ® Lemon Oil Furniture Polish; Windex glass cleaner.
The simplest way to handle any accumulated dust... besides regular dusting of once a week or so... is to use the hose, extension wands, and dust head attachment from you household vacuum cleaner. I use a 5½-gallon Shop Vac ® with a round dusting brush. Be sure not to press the dust down into the fur or hair.
The way to avoid this, is the go with the direction of the coat, but in an up and down motion, the entire length of the mount, be it a head mount or lifesize.

It is advisable to remove the dust brush attachment, and vacuum the dust off the brush bristles using the end of the vacuum hose, then replace the brush attachment.
After the visible dust is removed, the move the duster head along the direction of the coat, still avoiding pressing too hard. Repeat the last step at least one more time, if not a third, and clean the brush attachment as before.
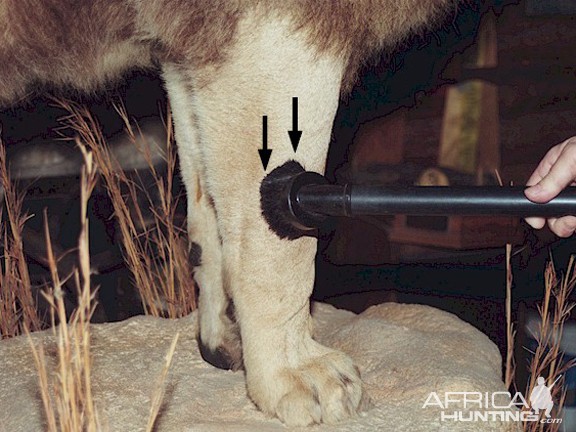
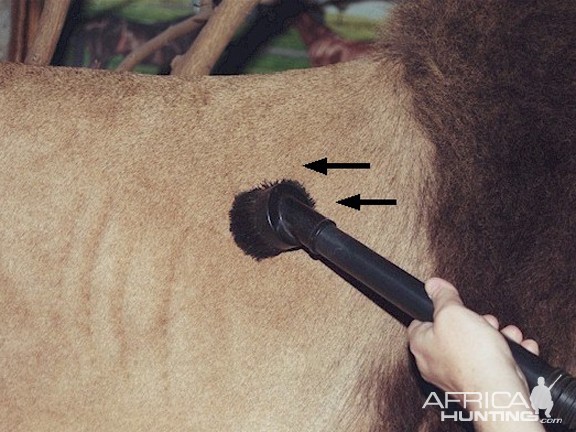
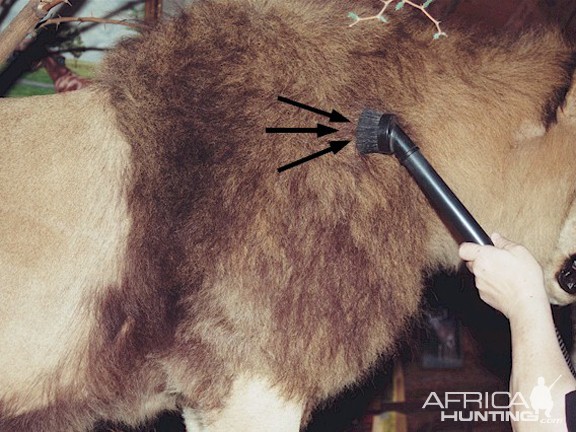
On African Lions, and other mounts with long or thick fur, such as Bears and Bison, use the dusting brush attachment in a "place and remove" action along the thick mane or body fur. In other words, don't vacuum the long, thick fur, in the direction of the fur growth. The dust needs to really be lifted from this heavy coat. After this, you can use the duster brush in the back and forth motion through the long, thick hair, until all dust is gone. Grooming the fur back into place will be done later.
The next step will restore a rich luster to the coat of the mount. "Detailing Towels" -- like those sold at Sam's Club and other stores -- make an inexpensive cleaning cloth. Using one of these clean white terrycloth towels, spray the surface lightly with Lemon Pledge ® furniture cleaner/polish. You don't need a lot for this step … just enough to lightly dampen the towel.
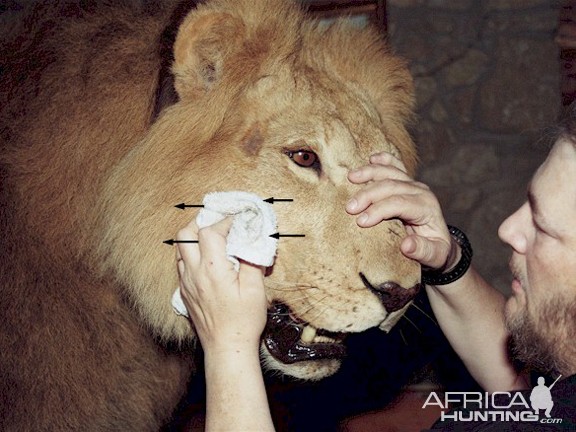
Starting with the head, gently run the towel with the Pledge ® along the face, with the lay of the hair or fur. On mammals such as the big cats, the facial fur runs in two directions. Just ahead or forward of the eyes, the fur runs down the face toward the nose... go with the fur direction. The rest of the facial fur runs from front to back as usual.
After rubbing down the face, lightly respray the towel, and continue along the neck of the mount. Repeat spraying the towel, and continue onto the shoulders.
On a lifesize mount, spray, towel and repeat along each quadrant of the mount... shoulders, forequarters and each foreleg, mid section or "torso", hind upper thighs and rump, both hinds legs, and finally the tail. Allow the mount to dry for a few minutes, and repeat... from front to rear end.

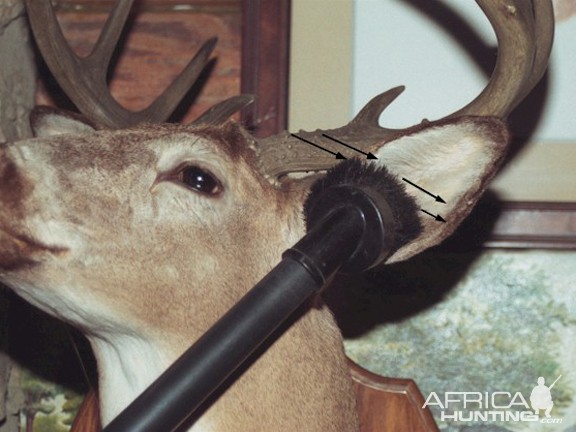
For antlers, be sure to dust them well. A light spray of Endust ® on a detailing towel – or sprayed on a sheet of paper towel – works well here. Another product that works great are the Swiffer ® dusting cloths. Just be aware of any parts of antlers that can "catch" the material. It will pull off little strands, and they are just annoying to hand pick from the antlers.
The horns of African and other horned species – such as Pronghorn Antelope -- are notorious for having little "grabby" surfaces … this is especially so with the horns of Wildebeest and Cape Buffalo. They are best dusted with the vacuum cleaner's dust brush attachment. After removing all heavy dust, go over the horns, especially the areas of the bosses, and a little further up the horns where the texture is "ragged", using a nylon cleaning brush like those sold in hardware stores and home improvement centers. They are very inexpensive, and are good to have in your trophy-cleaning arsenal.
NEVER USE ANY OIL OF ANY KIND ON THE HORNS OF AFRICAN TROPHIES, OR SHEEP HORNS! THE OIL WILL BLACKEN THE HORNS OF AFRICAN MAMMALS, AND UNNATURALLY DARKEN THE HORNS OF SHEEP, IN SOME CASES GIVING THEM A SPLOTCHY APPEARANCE! LINSEED OIL, NEAT'S FOOT OIL, OLD ENGLISH FURNITURE POLISH, OR MURHPY'S OIL SOAP, ARE TO BE AVOIDED WHEN IT COMES TO CLEANING HORNS. A CLEAN WHITE TOWEL, DAMPENED WITH WATER IS ALL YOU NEED FOLLOWING A GOOD DUSTING WITH THE VACUUM CLEANER. NO MATTER WHAT YOU HEAR, OR READ ELSEWHERE, NEVER USE OIL ON HORNS! PERIOD!
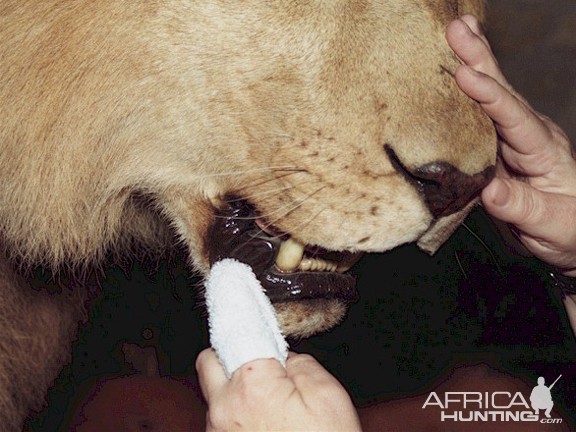
Any mounts having an open mouth – African Lion, Leopard, Hyena, Crocodile, Hippo, Cougar (Mountain Lion), Wolf, Fox, Bear, etc. – also need attention to this detail in order to keep your mount fresh in appearance. Most open mouths are treated with a final coat of either lacquer or acrylic gloss to impart a “wet” look to the mouth. While this is common practice, often times mouths are made to look a little too wet for my taste.
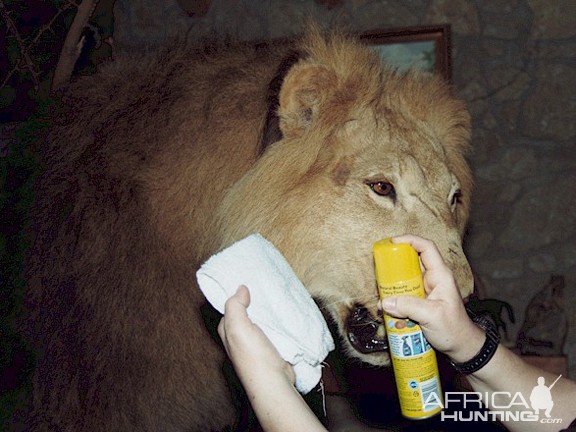
Regardless, in order to maintain the wet look, the open mouths of mounts need to be dusted as well. The best way is to use a can of compressed air … the type sold in office supply, computer, or even home improvement stores will do. Just be aware to not shake the can while using it. The freezing air that will shoot out can dull the shiny, wet finish in the mouth.
You simply want to direct the air to the deep recesses of the open mouth, starting at the back of the mouth and working your way forward. This will blow any dust out of the mouth. If it still looks a little dull in there, the use of a clean, new makeup brush can further dislodge any dust particles that have not been blown away with the air only. If needed, the canned air can also be used to blow out the nostrils of a mount. I cannot recommend using the reverse airflow of a vacuum cleaner, as the air from this is very widely dispersed, and not concentrated as when using canned air. The air from a vacuum cleaner is also pretty warm and that will not do much good to the finish of the mount.
The dampness of the mouth and the outer lips of the mount can also be treated with a very light application of the Pledge spray polish. Apply it lightly to a clean detailing towel, and go over the lips … and even the nose pad.
Over the course of time, the glass eyes of your trophy mounts can become dull looking … one may say “dull and listless.” This is due to several factors: the ordinary dust in the home along with the accumulative affects of smoke in the air from cooking; and – if you are so inclined – from the effects of second hand smoke … in this case the nicotine buildup that comes from this type of smoke in the air. It is the same buildup smokers experience on the inside of their automobile windshields.
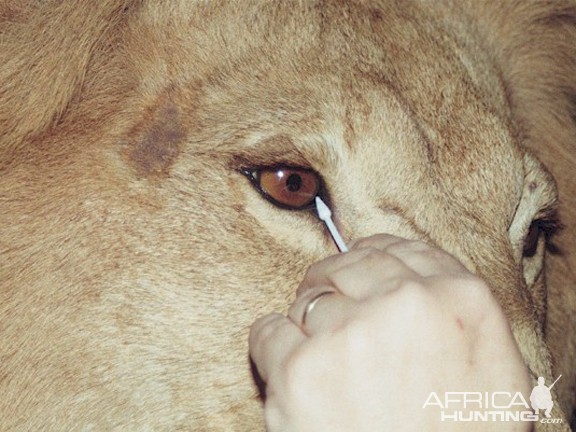
The glass eye scan easily be brightened up with a tiny amount Windex ® applied to a flat Artist's Brush, after which it is carefully wiped over the glass eyes until they appear bright and clear again. Be careful not to use too much cleaner on the brush, as you don't want the fluid running down into the lower eyelids, wetting them. You also want to avoid getting a cleaner like Windex ® on any of the finished fleshy parts, such as the eyelids. The ammonia contained therein can dry the oils in the animal's hide causing cracks to appear over time.

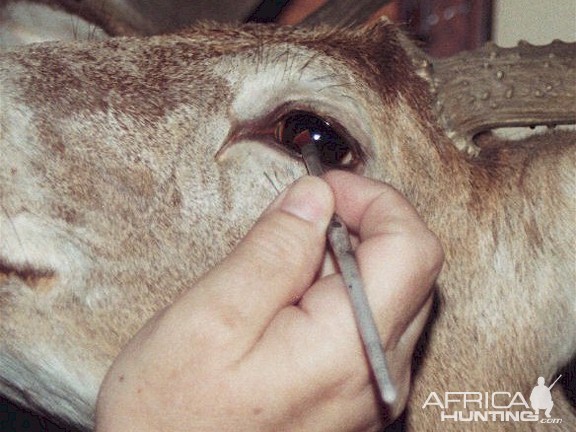
Using the double-end cosmetic swab, gently rub the eye clean and dry.
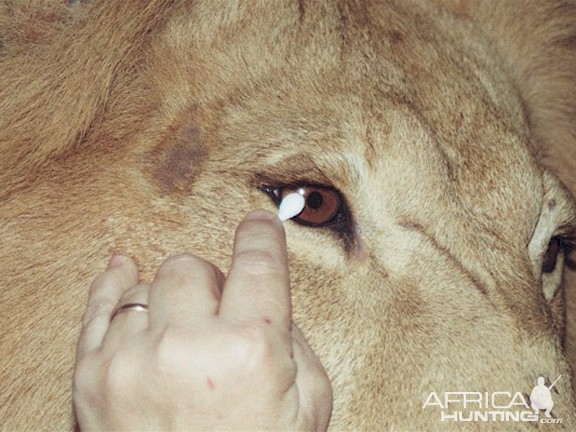

The nice feature on these swabs is the pointed end. While it is small and pointy enough to get into the front corners of the eye, it is soft enough not to damage either the glass eyes, or the eye finishing! Notice too, how shiny and reflective the glass eye is at this stage!
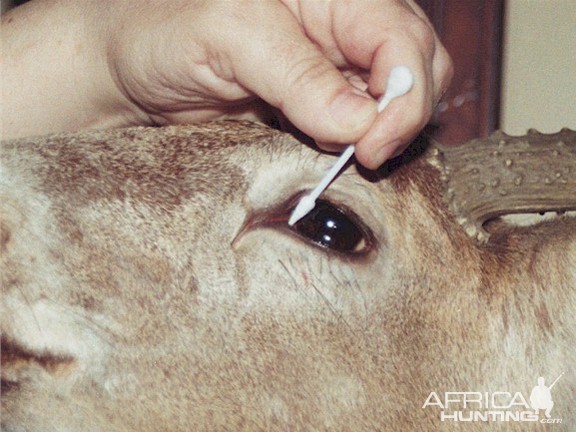
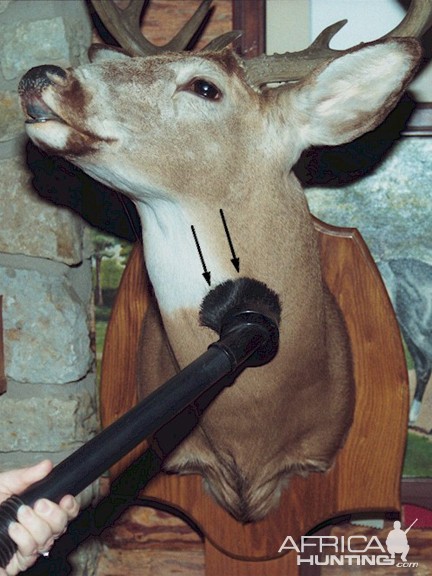
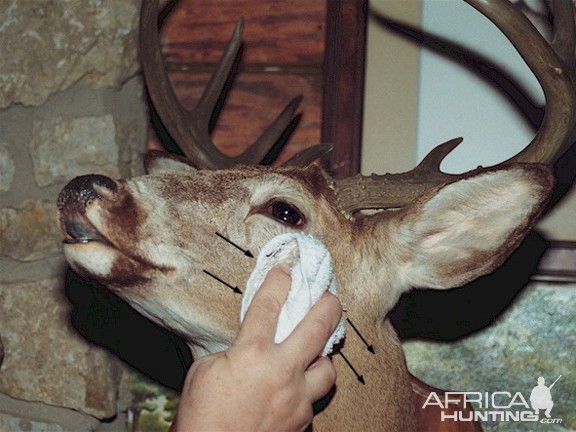
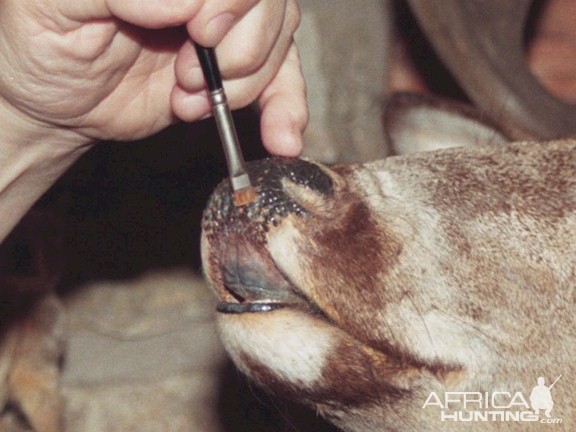
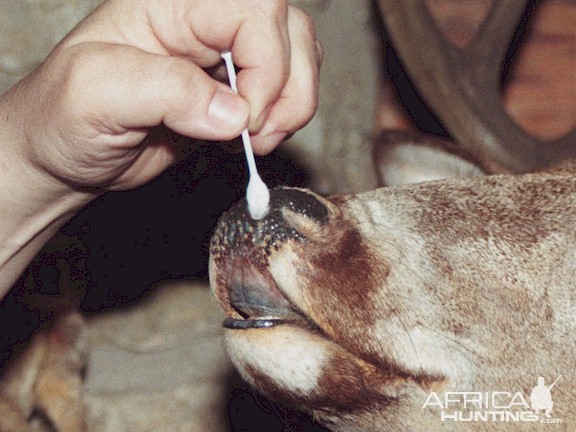
Finally nose pads on both carnivores and hoofed game trophies, can have a little life brought back to these parts as well! Here I apply a Windex-dampened brush over this deer's nose pad, as well as his recreated, exposed “gums”.
Older and/or more damaged mounts will require some repairs, usually on the eyelids, lips, and nose pads. Unless you are adept with sculpting epoxies and the use of oil paints or airbrush lacquer paints, I do not recommend trying these types of repairs on your own. A reputable Taxidermist is set up and has the skills needed to restore a trophy mount to its original luster! These jobs include repairing cracks in the skin of the eyelids, and nose pads, as well as frequently split and more severely damages ears.
Properly handled skins that are properly tanned, and mounted correctly, rarely -- if ever -- need those types of repairs.
If they received top-notch field care, were prepared by a professional Taxidermist, using proper tanning for the skins, and the best supplies available, then taken care of properly, your trophies should outlast you!
As a side note, the African Lion mount and the Whitetail Deer head shown in this article, are not new mounts! I mounted the Lion in 1994, and the Whitetail in 1989... that Deer is twenty years old, and looks as good today as the day he was completed! The reason is simple. Through regular care... mostly regular dusting and frequent gentle cleaning... and the fact that they were mounted properly to begin with... they have both maintained their "youthful appearance"! The fact is... they've held up better than me!
Take care all, and good hunting!
By John Bellucci
After you bring your hard won trophy home from the taxidermist, and hang it in the special place you've had in mind for it ever since you bagged it... is that the end of the trail? I should say not!
The first thing you should know is how to properly hang your trophy head on the wall. Never grab, nor balance, or in any other way put your hand on the neck of the mounted head. Most hoofed game mammals have rather hollow hair -- not fur like most predatory species -- and the hair is susceptible to breakage. The horns, or antlers, are "Nature's Handle"... at least when it comes to a game head mount anyway! You can hold a horn or antler in one hand, and have the brisket resting on the other hand, then lift the trophy to hang on the wall.
Be sure you have a screw -- not a nail -- with a large, flat head, secured into a wall beam for maximum strength! Make sure it sticks out from the wall enough to catch the screw head securely under the hanger attached to the backboard of the mount.
After hanging the head, look it over for any hair that may have been disturbed during the hanging up process. If there is any, use a soft hairbrush to gently lay the hair back down. Be sure there are no other hairs, or dander, in the hairbrush that can be transferred to your nice clean mount!
The biggest thing all mounted trophies have in common is they tend to become dust collectors! Not because they are there -- per say -- but because the very nature of the hair and fur, tends to generate a static electric "field", which is an attractant for dust. Add to this any smoke in the air from cooking and you have even more added to the normal dust in the air. Regular, weekly dusting with a soft cloth, or one of those new Swiffer ® Dusters, will keep your hard won trophy looking new for years. Like anything of value in your home, your mounted trophies deserve and need regular care to maintain them and keep them looking in like new condition!
These are some of the items for cleaning those hard-earned trophies. Left to right: Round ‘Duster” brush attachment for a Shop Vac ®; Cosmetic makeup swab double-end applicators; flat Artist's brushes; Pledge ® Lemon Oil Furniture Polish; Windex glass cleaner.
The simplest way to handle any accumulated dust... besides regular dusting of once a week or so... is to use the hose, extension wands, and dust head attachment from you household vacuum cleaner. I use a 5½-gallon Shop Vac ® with a round dusting brush. Be sure not to press the dust down into the fur or hair.
The way to avoid this, is the go with the direction of the coat, but in an up and down motion, the entire length of the mount, be it a head mount or lifesize.
It is advisable to remove the dust brush attachment, and vacuum the dust off the brush bristles using the end of the vacuum hose, then replace the brush attachment.
After the visible dust is removed, the move the duster head along the direction of the coat, still avoiding pressing too hard. Repeat the last step at least one more time, if not a third, and clean the brush attachment as before.
On African Lions, and other mounts with long or thick fur, such as Bears and Bison, use the dusting brush attachment in a "place and remove" action along the thick mane or body fur. In other words, don't vacuum the long, thick fur, in the direction of the fur growth. The dust needs to really be lifted from this heavy coat. After this, you can use the duster brush in the back and forth motion through the long, thick hair, until all dust is gone. Grooming the fur back into place will be done later.
The next step will restore a rich luster to the coat of the mount. "Detailing Towels" -- like those sold at Sam's Club and other stores -- make an inexpensive cleaning cloth. Using one of these clean white terrycloth towels, spray the surface lightly with Lemon Pledge ® furniture cleaner/polish. You don't need a lot for this step … just enough to lightly dampen the towel.
Starting with the head, gently run the towel with the Pledge ® along the face, with the lay of the hair or fur. On mammals such as the big cats, the facial fur runs in two directions. Just ahead or forward of the eyes, the fur runs down the face toward the nose... go with the fur direction. The rest of the facial fur runs from front to back as usual.
After rubbing down the face, lightly respray the towel, and continue along the neck of the mount. Repeat spraying the towel, and continue onto the shoulders.
On a lifesize mount, spray, towel and repeat along each quadrant of the mount... shoulders, forequarters and each foreleg, mid section or "torso", hind upper thighs and rump, both hinds legs, and finally the tail. Allow the mount to dry for a few minutes, and repeat... from front to rear end.
For antlers, be sure to dust them well. A light spray of Endust ® on a detailing towel – or sprayed on a sheet of paper towel – works well here. Another product that works great are the Swiffer ® dusting cloths. Just be aware of any parts of antlers that can "catch" the material. It will pull off little strands, and they are just annoying to hand pick from the antlers.
The horns of African and other horned species – such as Pronghorn Antelope -- are notorious for having little "grabby" surfaces … this is especially so with the horns of Wildebeest and Cape Buffalo. They are best dusted with the vacuum cleaner's dust brush attachment. After removing all heavy dust, go over the horns, especially the areas of the bosses, and a little further up the horns where the texture is "ragged", using a nylon cleaning brush like those sold in hardware stores and home improvement centers. They are very inexpensive, and are good to have in your trophy-cleaning arsenal.
NEVER USE ANY OIL OF ANY KIND ON THE HORNS OF AFRICAN TROPHIES, OR SHEEP HORNS! THE OIL WILL BLACKEN THE HORNS OF AFRICAN MAMMALS, AND UNNATURALLY DARKEN THE HORNS OF SHEEP, IN SOME CASES GIVING THEM A SPLOTCHY APPEARANCE! LINSEED OIL, NEAT'S FOOT OIL, OLD ENGLISH FURNITURE POLISH, OR MURHPY'S OIL SOAP, ARE TO BE AVOIDED WHEN IT COMES TO CLEANING HORNS. A CLEAN WHITE TOWEL, DAMPENED WITH WATER IS ALL YOU NEED FOLLOWING A GOOD DUSTING WITH THE VACUUM CLEANER. NO MATTER WHAT YOU HEAR, OR READ ELSEWHERE, NEVER USE OIL ON HORNS! PERIOD!
Any mounts having an open mouth – African Lion, Leopard, Hyena, Crocodile, Hippo, Cougar (Mountain Lion), Wolf, Fox, Bear, etc. – also need attention to this detail in order to keep your mount fresh in appearance. Most open mouths are treated with a final coat of either lacquer or acrylic gloss to impart a “wet” look to the mouth. While this is common practice, often times mouths are made to look a little too wet for my taste.
Regardless, in order to maintain the wet look, the open mouths of mounts need to be dusted as well. The best way is to use a can of compressed air … the type sold in office supply, computer, or even home improvement stores will do. Just be aware to not shake the can while using it. The freezing air that will shoot out can dull the shiny, wet finish in the mouth.
You simply want to direct the air to the deep recesses of the open mouth, starting at the back of the mouth and working your way forward. This will blow any dust out of the mouth. If it still looks a little dull in there, the use of a clean, new makeup brush can further dislodge any dust particles that have not been blown away with the air only. If needed, the canned air can also be used to blow out the nostrils of a mount. I cannot recommend using the reverse airflow of a vacuum cleaner, as the air from this is very widely dispersed, and not concentrated as when using canned air. The air from a vacuum cleaner is also pretty warm and that will not do much good to the finish of the mount.
The dampness of the mouth and the outer lips of the mount can also be treated with a very light application of the Pledge spray polish. Apply it lightly to a clean detailing towel, and go over the lips … and even the nose pad.
Over the course of time, the glass eyes of your trophy mounts can become dull looking … one may say “dull and listless.” This is due to several factors: the ordinary dust in the home along with the accumulative affects of smoke in the air from cooking; and – if you are so inclined – from the effects of second hand smoke … in this case the nicotine buildup that comes from this type of smoke in the air. It is the same buildup smokers experience on the inside of their automobile windshields.
The glass eye scan easily be brightened up with a tiny amount Windex ® applied to a flat Artist's Brush, after which it is carefully wiped over the glass eyes until they appear bright and clear again. Be careful not to use too much cleaner on the brush, as you don't want the fluid running down into the lower eyelids, wetting them. You also want to avoid getting a cleaner like Windex ® on any of the finished fleshy parts, such as the eyelids. The ammonia contained therein can dry the oils in the animal's hide causing cracks to appear over time.
Using the double-end cosmetic swab, gently rub the eye clean and dry.
The nice feature on these swabs is the pointed end. While it is small and pointy enough to get into the front corners of the eye, it is soft enough not to damage either the glass eyes, or the eye finishing! Notice too, how shiny and reflective the glass eye is at this stage!
Finally nose pads on both carnivores and hoofed game trophies, can have a little life brought back to these parts as well! Here I apply a Windex-dampened brush over this deer's nose pad, as well as his recreated, exposed “gums”.
Older and/or more damaged mounts will require some repairs, usually on the eyelids, lips, and nose pads. Unless you are adept with sculpting epoxies and the use of oil paints or airbrush lacquer paints, I do not recommend trying these types of repairs on your own. A reputable Taxidermist is set up and has the skills needed to restore a trophy mount to its original luster! These jobs include repairing cracks in the skin of the eyelids, and nose pads, as well as frequently split and more severely damages ears.
Properly handled skins that are properly tanned, and mounted correctly, rarely -- if ever -- need those types of repairs.
If they received top-notch field care, were prepared by a professional Taxidermist, using proper tanning for the skins, and the best supplies available, then taken care of properly, your trophies should outlast you!
As a side note, the African Lion mount and the Whitetail Deer head shown in this article, are not new mounts! I mounted the Lion in 1994, and the Whitetail in 1989... that Deer is twenty years old, and looks as good today as the day he was completed! The reason is simple. Through regular care... mostly regular dusting and frequent gentle cleaning... and the fact that they were mounted properly to begin with... they have both maintained their "youthful appearance"! The fact is... they've held up better than me!
Take care all, and good hunting!
Last edited by a moderator: