Mannlichering a G33/40

nztimb

AH ambassador
Joined
May 5, 2009
Messages
5,410
Reaction score
22,169
Media
1,632
Articles
6
Hunting reports
Australia/NZ
4
Hunted
New Zealand, Austaralia
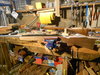
When I was through at the gunsmiths the other day I called in to see Euan and picked up a German precarve mannlicher stock and a G33/40 barrelled action in 8x57 he had. When we discussed the style for the finished rifle he showed me another rifle from his collection that has a minimalist stock with a Prince of Wales grip. I have always wanted to do one of these so was pleased with the chalenge of taking the 70/s styled stock and making it into a early Germanic styled mannlicher for him.


This is the style to emulate


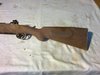
The B/A inlet was one of the trickier ones to do as the precarve had a 1/2 in barrel channel that ran off from the action inlet and when it was all settled in there was a good 1/4 in more wood on one side than the other added to which the barrel is the original military with the 5 steps from the barrel flange through to the final slightly tapered portion.


With a full length stock there is no way to grasp the barrel to lift it out of thenstock so I put the base end of a firm fitting drill bit into the bore and taped it in position.


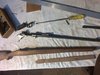
I got the bottom metal inlet yesterday so todays will concentrate on the cteel butt plate which caused a little measureing and conversation with Euan. When the trigger to centre of butt with the old butt plate removed it showed a 13 1/4 L O P. I was concerned that when I cut the curve for the TOTW checkered butt plate it might shorten the L O P too far for comfortable use. The curve requires a little more than a 1/4 in but the steel plate is near that in thickness so it should end up at better than 13 1/8 which is right in the fast mount length for both Euan and I so he is happy with that.
 

Attachments

  • Photo3043_zpsv7jefivy.jpg
    Photo3043_zpsv7jefivy.jpg
    414.2 KB · Views: 188
  • Photo3031_zpsu1lczmld.jpg
    Photo3031_zpsu1lczmld.jpg
    452.6 KB · Views: 184
  • Photo3041_zps2mfpp2xz.jpg
    Photo3041_zps2mfpp2xz.jpg
    440.6 KB · Views: 171
  • Photo3032_zpstttuv3w4.jpg
    Photo3032_zpstttuv3w4.jpg
    464.6 KB · Views: 180
Last edited by a moderator:
You are a very talented person sir! I salute you!
 
Had a little time in the shed this morning but have been invited out for lunch so may not get back to it today again.
First off I fitted the new butt plate and had to grind it a lot more than usual to fit the available wood.
This is the ground one beside an untouched one.

Then marking in the changes I wanted to make

after running it through the bandsaw the shape could start to be changed


Attachments

  • Photo3049_zpsy2lkl4gh.jpg
    Photo3049_zpsy2lkl4gh.jpg
    333.3 KB · Views: 177
  • Photo3053_zpspcfnqada.jpg
    Photo3053_zpspcfnqada.jpg
    503.4 KB · Views: 168
  • Photo3050_zps2is8y9ob.jpg
    Photo3050_zps2is8y9ob.jpg
    239.1 KB · Views: 177
  • Photo3052_zpsqycipkjg.jpg
    Photo3052_zpsqycipkjg.jpg
    377 KB · Views: 185
A couple of hours this morning had the buttstock looking a bit better with the action tang and rear of T/G reshaped to slim things down. May not do anything else now till Euan gets the metal forend cap as that will dictate the forestock lines.


Attachments

  • Photo3054_zps5s2fgbjq.jpg
    Photo3054_zps5s2fgbjq.jpg
    357.6 KB · Views: 205
Last edited by a moderator:
Very nice!
 
I am going to have to do a lowered left side through the action rail length to accomadate the "thinned for lightening" rail behind the thumb notch. Will do it like this one
Swede_zpsuvyzt9od.png
 
Last edited by a moderator:
I can hardly wait to see the finished product. Keep the comments and photos coming.
 
One last little effort in the roughing shape was the thumb notch and window.
First off the bolt release needed to be fitted so marking what needed removing gave me an idea where to remove wood.

Before fitting into place I like to radius the front edge of the bolt release as it makes the corner of the remaining wood a little stronger than when it is cut square. Then some shaping to make the shelf and add some contour to the stock sides

All that was left to do was to radius the front and rear of the T/G for a more rounded stock bottom that will make for a better hand shaped carry.


Now it really will have to sit untill the muzzle cap arrives.
 

Attachments

  • Photo3061_zpshrzjc14g.jpg
    Photo3061_zpshrzjc14g.jpg
    419.4 KB · Views: 166
  • Photo3059_zpsvdpe6cp6.jpg
    Photo3059_zpsvdpe6cp6.jpg
    418.3 KB · Views: 171
  • Photo3056_zpsvbrmdlnm.jpg
    Photo3056_zpsvbrmdlnm.jpg
    428.9 KB · Views: 156
  • Photo3060_zpsikpid5xz.jpg
    Photo3060_zpsikpid5xz.jpg
    282.3 KB · Views: 161
Last edited by a moderator:
Great job, I like the way this project is coming along.
 
The muzzle cap has arrived and seeing it makes me realise just how much will have to come off the stock dimensions to not only fit the cap but to take those nose dimensions bac to the bottom metal

So having marked arround the cap I needed to mark the rear of the stub. wrap it at that point and run arround with the 18pti blade on the hacksaw.


Here you can see the lines marked in to cut back the underbelly. One line is marked in as a straight taper with the top line being one that runs parralell to the top of the stock line back for about 6-7 inches where the sling bar is located and drilled through.


and after a run through the bandsaw


Attachments

  • Photo3130_zpseypjo6bx.jpg
    Photo3130_zpseypjo6bx.jpg
    247.4 KB · Views: 175
  • Photo3131_zpsrbvpr03s.jpg
    Photo3131_zpsrbvpr03s.jpg
    285 KB · Views: 174
  • Photo3132_zpszrp0af59.jpg
    Photo3132_zpszrp0af59.jpg
    223.7 KB · Views: 157
  • Photo3133_zpsqllnktlt.jpg
    Photo3133_zpsqllnktlt.jpg
    214.1 KB · Views: 149
  • Photo3134_zpssozvnq8y.jpg
    Photo3134_zpssozvnq8y.jpg
    238.2 KB · Views: 161
  • Photo3136_zpsj7asuze2.jpg
    Photo3136_zpsj7asuze2.jpg
    188.8 KB · Views: 197
Last edited by a moderator:
Got the forestock shaped up although there is still a lot of slimming down to do at least the profile is about done.
Photo3137_zpsaixnz7to (1).jpg
Photo3138_zpshz1sq3lj.jpg
 
Last edited by a moderator:
How many hours does it take you to make a Mannlicher stock from a "pre-carved"blank? From one of your other posts I see that you have sent gunstocks to the U.S. After seeing how this project is shaping up I might like to have you make me a Mannlicher stock for a 6.5x55 Swedish Mauser.
 
I will have about 30 hrs into this by the time I get it ready for the finish but then there was the changing of the pistol grip to the POW and reshaping the cheekpiece and the many stepped barrel that took a bit more time
 
After the extended wait for the bolt handle I was abe to get the rifle finished so got a couple of pics in the winter sinshine today before it was picked up this afternoon.


Attachments

  • DSCN0021_zpsdxr8qobe.jpg
    DSCN0021_zpsdxr8qobe.jpg
    223.3 KB · Views: 155
  • DSCN0020_zps3gt9ktrt.jpg
    DSCN0020_zps3gt9ktrt.jpg
    221.4 KB · Views: 174
  • DSCN0019_zpszrt3hfim.jpg
    DSCN0019_zpszrt3hfim.jpg
    206.9 KB · Views: 176
Last edited by a moderator:
I think every one should have at least 5-10 Mannlicher stock rifles:)
 
Looks awesome, makes me wish I had at least one rifle with a Mannlicher stock.

And your next project is????
 
Looks awesome, makes me wish I had at least one rifle with a Mannlicher stock.

And your next project is????
I have a BSA Viscount that I have started on. It had been broken through the wrist and repaired but the guy wants a replica new one made. The stock is pure 70's with 45* forend tip and white line spacers everywhere so I am doing it the same except there will be no white line spacers and the rosewood tip and cap will be ebony.
I thought it might be a bit plain to post here but I am posting it on the local forum (here in NZ) for the guys to see how easy something like this can be so will post it here as well.
This is it so far

Had another restock to start today with a BSA Viscount needing a bit of a smarten up. It had been broken through the wrist at some stage and repaired. While it was and is servicable it left the owner wanting it looking a bit smarter.
With a plank of quite plain plank sawn walnut (albeit with a couple of knots in it) to cut the blank from and laying the BSA stock for good grain flow for it to be replicated in all aspects except the white line spacers, the first cuts were made. An ebony forend tip and grip cap with be substituted for the rosewood on the original stock (but keeping the 45* angle instalation) and a thin black decelerator will go on instead of the thick red ventilated pad


Checking for cast before laying out the inlet lines I found there was about 3/16 so have to keep that in mind for setting the recoil pad and shaping.

A while later the barrelled action is starting to find its way down into the blank.
 

Attachments

  • DSCN0018_zpsv7jk5ip9.jpg
    DSCN0018_zpsv7jk5ip9.jpg
    345.6 KB · Views: 181
  • DSCN0015_zpsgirho6xq.jpg
    DSCN0015_zpsgirho6xq.jpg
    385.6 KB · Views: 167
  • DSCN0013_zpsbibekvxo.jpg
    DSCN0013_zpsbibekvxo.jpg
    286.9 KB · Views: 190
  • DSCN0012_zpsu9emhrfb.jpg
    DSCN0012_zpsu9emhrfb.jpg
    312.3 KB · Views: 169
Last edited by a moderator:
After the main inlet was done the forestock was cut to the 45* angle to replicate the original and a piece of ebony cut and doweled, epoxied and cramped into place overnight. because of the very cld weather a light was kept on close enough to keep the temps in the right setting zone for the epoxy

The next morning the barrel channel can be marked in and extended through the ebony. It is done this way as all inletting is done using a smoker on the steel and it dosent show clearly enough on the ebony to give an accurate reading. By having the channel in the walnut I can use straight edge steel rule to get it all to the same barrel clearance as the main cannel after the first inch or so of the chamber is bedded hard into the wood.

Ater it is all commonally inletted the B/A is set in and checked visually at this stage. Final clearance is done after the bottom metal is inlet and the action screws can be tightened and the floating portion of the barrel can be attended to.
 

Attachments

  • DSCN0030_zps68fmfhsy.jpg
    DSCN0030_zps68fmfhsy.jpg
    351.8 KB · Views: 181
  • DSCN0029_zpsk9evmbhx.jpg
    DSCN0029_zpsk9evmbhx.jpg
    288.2 KB · Views: 193
  • DSCN0028_zpsdpayuuoe.jpg
    DSCN0028_zpsdpayuuoe.jpg
    329.2 KB · Views: 171
Last edited by a moderator:
We always like seeing your projects keep posting
 
It was time to do a little more on the BSA so shaped the (grindable)decelator pad and set it onto the buttstock for the 3/16 cast


and marked out the cheekpiece


then the shaping got underway


Attachments

  • DSCN0046_zps0r10xp9b.jpg
    DSCN0046_zps0r10xp9b.jpg
    309.6 KB · Views: 166
  • DSCN0038_zpsw8xzuatv.jpg
    DSCN0038_zpsw8xzuatv.jpg
    303.3 KB · Views: 149
  • DSCN0039_zpsgccuvqjd.jpg
    DSCN0039_zpsgccuvqjd.jpg
    310.9 KB · Views: 158
Last edited by a moderator:

Forum statistics

Threads
53,632
Messages
1,131,580
Members
92,701
Latest member
jack849688


Latest posts

Latest profile posts

Early morning Impala hunt, previous link was wrong video

Headshot on jackal this morning

Mature Eland Bull taken in Tanzania, at 100 yards, with 375 H&H, 300gr, Federal Premium Expanding bullet.

20231012_145809~2.jpg
 
Top