Beding question on 416 rigby

JamieD

AH veteran
Joined
Jan 20, 2011
Messages
153
Reaction score
5
Media
8
Hunting reports
Africa
3
Member of
life member NAHC NRA
Hunted
US, RSA, ZIM
I have a Rem. 700 I had converted to a 416 Rigby. It shot fare 1"-1 1/2 but I had some feeding issues with the seekins box magazine so with 60 days to Africa I sent the rifle to Wyatts. I just got it back 30 days to Africa and it feeds great but strings its shots vertically 2 1/2"-4 1/2" not wanting to wast more time and it being a long weekend I took the stock off. I found a piece of bedding in one of the screw holes this may be the problem. I also found a shiny spot on the barrel 1" in front of the receiver at about 5 o-clock I thought if it was at 6 o-clock that would be ok but at 5 it may affect accuracy.

To the question, if a barrel is free floated should it be all the way to the receiver, or with a heave barrel, 6 contour should the barrel be touching the stock the first couple of inches.

Thanks for any input :)
 
Its more or less normal to bed the first couple of inches ahead of the receiver whether heavy barrel or not. Yes the shiny spot can be a culprit but it may not. Is it possibly touching near the forend tip? If it shot 1-1.5 inch which is actually good, not fair, before-then it should still do that. Check with a fairly thick pc of paper from forend to receiver under the barrel and see if it sticks anywhere. If it does sand out those areas where it rubs. All this of course, if it is supposed to be fully floated.
 
Jamie D

I had the same issue with my colt sauer 7 MM mag.

When shooting take a $1 dollar bill and try and move it between the barrel and the forearm stock do this prior to the first shot and then after each shot. The issue will be found with the dollar bill it will stick at the point that the barrel is making contact with the forearm.

Now if you want to do this at home prior to going to the range use 2 or 3 dollars thickness until you find the sticking point...and then go to work on it...

A little sand wet and dry sand paper was all that was needed wrapped around a wood dowel to sand the location...repeat until you do not have a contact issue.

Second dissemble the rifle and put the front screw in first snug and then place the rear screw and then check tightness starting with one then the other screw until i think it is 65 foot pounds for both screws.

PS: i like to take wax and coat the barrel on the underside at this point prior to re assemble.

I think the first item will cover you however have all the available material at the range when you go...take a stock sealer to reseal your wood if you have to use the sand paper...
 
JamieD,

Was the bedding found in the screwhole something you think fell in after removing the stock? Or do you think it was there all along? I do know that if those screws are not properly tightened (and they can be over tightened) you will be chasing shots. I'd make sure that hole is cleared and the screws properly tightened. If the only work that Wyatt's did was on the magazine and nothing else, the screws would be my first guess. I've even seen those screws not properly tightened on rifles out of the box.

Other than that, I second ses' and James' suggestion for ensuring the barrel is floated properly.
 
Good one Phoenix phil

i too have had the screws not to the right setting on a rifle and in fact on one new factory rifle the screws was not even engaged. the front screw on a rifle was just lose, i would have hated to see what would have happen if i went to the range to shot the rifle...

The other thing I've found that I should have mentioned is the miracle that is Blue Loctite. I've had screws come undone that were tightened down properly. I don't know for sure, but I think that as we take our guns apart and reassemble that a certain amount of wear happens on the both the male/female threads. Under those conditions,eEven when you tighten these to spec ft-lbs, they can manage to start wiggling loose with the stresses of firing the gun. The more you fire the looser they get and the more they then turn with subsequent firing and the looser they are and into the graveyard spiral you go.

This is where a tiny drop of BLUE Loctite becomes your friend. I emphasize BLUE, it's the least difficult to break if you later take the gun apart. Also, if you do use it and disassemble, you should clean the threads before re-assembling.
 
Thanks a bunch for all the ideas lots of good stuff I'll try tomorrow.

I live in the country, I have a bench set up in the garage with crony inside I'm spoiled. So I can play with some of these ideas.

The stock is a McMillian fiberglass so I don't have to reseal. Wyatts box is a little smaller so he had to do some bedding, he must have gotten some in one of the holes because a piece fell out of the front hole and was around the hole. I believe that it was transferring recoil though the screw rather than the lug, as I see a small chip ahead of the floorplate that wasn't there before. I hope that this was the real problem, but thought that I would work on the bedding as I had seen the shine spot on the barrel.

I don't put much money into looks, I put a lot of money into function. I know that 1"-1 1/2" is ok but for what I spent on this rifle it could shoot half that.

With my trip coming though if I can get it back to were it was that would be more than great!

James I like the idea of the bills between shots because if the material in the screw hole isn't the issue then there is something happening between shots to make them string like they are. sideways the group is 1/2" to 1 1/2" up and down the last group was 5".

Thanks again for the help I'll tell you how things go tomorrow.
 
Shouldn't the pressure be on the front piller. I got up this morning and thought I'm going to get this rifle to shoot today.

I did a little more sanding in the barrel channel put some of the wife's lipstick, her idea, around on the front piller, and put it together. No lipstick on the action!!!

I'm not sure I should do more sanding as I'm afraid that I will start putting all the pressure on the end of the lug when I tighten it down. Am I thinking right?

If so I think I will have to make a emergency visit to the smith to have the stock rebedded.
 
JamieD

Free floating the barrel...

A free-floating barrel is a specific design technology used in highly accurate rifles, particularly match grade rifles, to increase the accuracy of the weapon.

With normal rifles, the barrel rests in contact with the stock. If the stock is manufactured of wood, environmental conditions or operational use may shift alignment of the stock, which may cause the barrel to shift its alignment slightly over time as well, altering the projectile flightpath and impact point. Contact between the barrel and the stock also interferes with the natural frequency of the barrel, which can have a detrimental effect on accuracy in some cases. The interference of the stock with the barrel's forced oscillation as the bullet passes down the bore can cause the barrel to vibrate inconsistently from shot to shot, depending on the external forces acting upon the stock at the time of the shot. Micro-vibrations acting during the bullet's passage result in differences in trajectory as the bullet exits the bore, which changes the point of impact downrange.

A free-floating barrel is one in which the barrel and stock are designed to not touch at any point along the barrel's length. The barrel is attached to its receiver, which is attached to the stock, but the barrel "floats freely" without any contact with other gun parts, other than the rifle's sights. This minimizes the possible mechanical pressure distortions of the barrel alignment, and allows vibration to occur at the natural frequency.

Alternatives include using a stock manufactured from composite materials which do not deform as much under temperature changes or humidity changes, or with a wood stock using a fiberglass contact area (so-called glass bedding). Stocks which contact the barrel are still popular for many utility weapons, though the most accurate have largely moved to free-floating barrels.
 
Floating and Bedding: Accurizing Your Rifle

Many of us hunters and shooters hear a lot about "floating," "free floating," or "pressure bedding" rifle barrels, "bedding" the action, "glass bedding" the barrel, and such as that. What does it all mean, and how might it be helpful to you? Such questions are simple and complex at once, because rifles are often as individual as people - but the basics are easy to explain. Most of these methods are employed almost exclusively on bolt-action rifles.

Floating (or free floating) a rifle's barrel means isolating it from everything forward of the chamber (rear) portion of the barrel. Basically, the only parts of the barreled action (which consists of the receiver and barrel as a unit) that touch the stock are the receiver and the fatter chamber portion of the barrel - everything forward of the chamber is free-floating, and touches nothing.

Why float a barrel? Well, when a rifle barrel heats up due to the high temperatures resulting from firing a cartridge, the metal naturally expands. Pressure on various points along its length from high spots in the stock's barrel channel can cause the barrel to bend ever so slightly as it heats up, which naturally may cause bullets to fly someplace other than where the previous shot(s) went.

Since a floated barrel doesn't touch the stock along its length, that variable is removed from the equation. Sometimes it works to improve repeatable accuracy, and sometimes it doesn't. Floating is at its best when used with rifles that have relatively heavy (large diameter) "bull" barrels, because they are less flexible than slimmer barrels. Lighter "sporter" barrels are less stable, and may flex enough during the shot that accuracy will suffer.

Pressure bedding is usually a form of floating. Remington uses a form of this on their Model 700 rifles - usually leaving a built-up portion of the stock in the barrel channel which applies pressure to the bottom of the barrel at the front end of the forearm, but otherwise the barrel is floated. Sometimes this works well, and sometimes it doesn't.

When shooting a Remington M700 in 222 Rem, I was very pleased at the accuracy of the rifle and the cartridge - but only out of a cold barrel. As the barrel heated, groups would open wide. A close inspection showed that the build-up at the fore-end was very large - so large that with it there, the forward action screw could not be tightened fully. The barreled action was in firm contact with the stock only at the rear of the action and the front end of the stock.

I attacked the build-up with sandpaper, and removed it completely. When I was done, I had free-floated the barrel and could tighten both action screws thoroughly, gaining firm contact between stock and receiver, with the barrel touching no part of the stock forward of the chamber. I happily headed to the range, hoping that I had cured my rifle of sucking eggs.

I had not.

The rifle still strung shots as the barrel heated, same as before. I decided to try a method I'd seen mentioned in a book called "Make it Accurate," which involves trying varying amounts of pressure against the barrel at different points, until accuracy is improved. In my case, this meant cutting a piece of a business card and adding it as a shim under the barrel at the fore-end - where the huge build-up of wood had been when it came from the factory. Bingo! She settled right down and started acting like the accurate rifle that I knew she could be. The pressure-bedding idea that Remington had used was the right idea, but in this case it had been poorly implemented at the factory.

Pressure bedding can be used in rifles other than bolt-actions, too. The book mentioned above talks about using a small shim under the barrel located roughly midway between the receiver and barrel screw to improve the accuracy of a single-shot rifle.

Bedding the action consists of creating a stable and consistent contact surface between the action (a.k.a. receiver) and the stock. This is most often accomplished using compounds designed specifically for this purpose. These are available in kits, which include directions and a release agent to be applied to the action.

Bedding compound is often a fiberglass resin type of material which is applied to the stock, and then the action - with release agent dutifully applied everywhere it will contact the compound - is installed into the stock, and the action screws tightened. That's when you'd better have plenty of release agent properly applied, because that's what keeps the action from sticking to the bedding compound as it dries.

Still another type of bedding involves simply bedding the recoil lug of a bolt-action rifle to its inlet in the stock. This provides a solid and repeatable mating surface between the recoil lug and stock, eliminating uneven bearing between the two. When you read that a run-of-the-mill factory rifle comes bedded from the factory, this is usually the method they use. It uses the same compounds and release agents as full bedding of the action, but on a smaller scale.

Finally, full-length glass bedding is something that's done on a larger scale, with the goal of providing complete and constant contact between the stock, action, and barrel. This is the most difficult type of bedding to do properly, and it's probably the least-used method of bedding. Usually, a rifle can be made to shoot with acceptable accuracy without resorting to full-length bedding.

Any or all of these methods may yield good results with a given rifle - and then again, they may not. There are no hard-and-fast rules when it comes to accurizing a rifle. Try several different brands and/or loads of ammo in your rifle, and if it won't shoot one with acceptable accuracy, then it's time to think about trying something different with the rifle itself.

The best advice I can give on this subject is to start small, and try various loads in the rifle after each small change. When you get it where you want it, STOP! Fiddling with it more may undo all the good that you have done, and trying to get your groups under one inch at one hundred yards is often difficult, and more often utterly pointless. One inch per hundred yards is minute-of-angle accuracy, and the vast majority of shooters need no better level of accuracy - especially for hunting purposes, since most big game animals are taken at relatively close range.

- Russ Chastain
 
It's a common question among precision rifle shooters. How tight should the action screws be? Why? What is the best way to tighten them? Are they necessary at all? Some shooters claim they can "tune" their rifle's accuracy by precisely tightening their action's screws.

7492d1309856871-beding-question-416-rigby-rifle_action_diagram.png


In a nutshell, action screws are there to keep the stock attached to the barreled action. Simple enough. But precision shooters seldom leave good enough alone. In the pursuit of accuracy, every element of the rifle is open to improvement. The goal is to create a good attachment that will consistently support the rifle's barrel and allow it to vibrate the same way from shot to shot. It turns out this isn't quite as easy as you might imagine - the forces involved can be significant.

It's All About Load Transfer
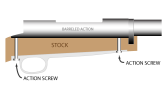
Think about what happens when you fire your rifle. The bullet takes off down the barrel, creating a recoil force on the rifle that will be perfectly in line with the barrel center line. That recoil is typically transferred to the stock through two mechanisms - (1) the recoil lug and (2) friction between the action and stock generated by the clamping force of the action screws.

7494d1309856872-beding-question-416-rigby-rifle_action_forces.png


In a solidly bedded stock, the recoil lug will be in firm contact with the stock. The recoil force will travel through the barrel to the lug and finally into the stock.

If the rifle's bedding is sloppy and the lug to stock contact is not solid, the friction of the stock to action contact is all that keeps the barreled action from slipping in the stock, which will cause the lug to bear on the stock. Now, it turns out that action screws are capable of exerting a lot of force - on the order of 1,000 pounds per screw, depending on the particulars. That means the friction connection will absorb a good portion of the recoil force before the action slips enough for the lug to make contact and start transferring load.

It also turns out for reasons I'll get into in a moment that the clamping force provided by action screws is tough to regulate. So it makes sense to remove the inconsistent frictional fore in favor of the more consistent recoil lug. (Note that there is also a school of thought that the recoil lug is an inherently poor design that causes vertical stringing - see Harold Vaughn's book, Rifle Accuracy Facts for an in depth discussion of that.)

So step one of getting the most out of your action screws is to reduce their impact by using a good, solidly bedded recoil lug.

But not being one to leave well enough alone, there's more to it than that.

Stock Creep
Even with a solid bedding job, it seems prudent to create as consistent an attachment between action and stock as possible.

But it's not that easy. Wood and plastics (even composites like fiberglass or carbon fiber) exhibit a material behavior known as "creep". Materials that creep deform slowly over time when placed under load. Silly putty is an extreme example. You can roll it into a ball, and leave it on the table. Come back a couple days later and it will no longer be a ball but a puddle. That's creep. All that material between your trigger plate and your action is being constantly squeezed by high forces (that thousand pounds per screw). That constant pressure will cause the stock material to creep out of the way, and the the clamping force to decrease over time. Consistency is the father of accuracy, they say.

7493d1309856872-beding-question-416-rigby-rifle_action_no_pillars.png


Some thoughtful shooters have taken to using a torque wrench to tighten their action screws prior to shooting. If you tighten them the same right before shooting, the theory goes, you'll have the same clamping force and better accuracy. If only that were true.

You can easily calculate the approximate clamping force a screw generates:

Clamping Force = Torque / ( Friction Constant * Thread Diameter )

or, more succinctly,

F = T / kd

The friction constant (k) is an empirically derived number that typically ranges between 0.1 and 0.3. Precise, clean, well lubricated threads will have a number closer to 0.1. Rough, dirty threads will be higher. A rule of thumb for regular dry screws is to use 0.2.

For example, a torque of 40 in-lb on a 1/4" screw with clean dry threads (k = 0.2) will exert 800 pounds of clamping force!

But did you notice how variable that pesky friction constant was? Simply adding a decent bolt lube to the screw can take your friction constant from 0.2 to 0.1, which *doubles* the clamping force. What this means in practice is that torque is a bad way to precisely regulate a screw's clamping force. A rule of thumb is that you should be able to get within 25% or so with a torque wrench, which is better than nothing, but not exactly precise.

Pillar Bedding Fixes Stock Creep
It turns out that metals like steel and aluminum do not creep. You can clamp them all day long and they won't budge. But you can't very well make a stock out of metal - it would weigh a ton, among other problems. Enter "pillar bedding". Pillar bedding is the technique of inserting metal tubes between the action and the trigger plate. Those tubes are permanently glued to the stock and the action screws run down the middle. What this accomplishes is that the pillars, being significantly stiffer than the stock material, absorb the vast majority of the clamping force. As a result, there is no creep since the stock is not under any pressure - it's all absorbed by the pillars.

7495d1309856873-beding-question-416-rigby-rifle_action_with_pillar_bedding.png


So now we've solved our creep problem. But what about the inconsistent clamping force problem? I've shown you why torque wrenches are not all that helpful. So what is? Well, one of the best way to measure the clamping force of the screw is to measure the length of the screw under load (that is, when it's tightened) and compare it to the unstressed length. You will see that the bolt actually stretches a little. That stretch is very consistently proportional to the clamping force. But how do you measure such a thing? You can't exactly whip out the calipers and measure the screw inside your rifle.

You can, however, do something similar. If you use precision, high quality screws, and precisely machined, clean pillars you will be able to use a very simple technique. Just tighten the screw to the point where the screw head just touches the pillar and there is no wiggle or play. At this point, there is no bolt stretch or clamping force to speak of. Next, turn the bolt head until you have your desired clamping force . The angle through which you turned the screw head will be proportional to the bolt stretch, which will be proportional to the clamping force. You can use a torque wrench to figure out how far you need to go, but once you've found the right angle to torque to - use that, not the torque wrench.

It's not perfect - this method is a little fiddly and requires precisely machined parts, but is generally considered a more accurate method than using a torque wrench.

Screwless Bedding
This article just scratches the surface of the technology behind the lowly screw. There are other techniques used in the aerospace industry for critical bolts - load sensing washers and ultrasonic bolt stretch detectors, for example. They are expensive, time consuming, and quite frankly, bordering on voodoo at times. It makes you wonder if action screws are a bad design.

So why not just forgo your action screws and just glue the action to the stock, as many benchrest shooters do? Actually, after writing this article, it's looking like more and more like a good idea when done by a properly experienced gunsmith. I'm still waiting for the best way to unite the stock and barreled action that doesn't require glue - perhaps this article gave you some ideas.

Practical Take-Away
The action screws are there to do one thing: hold your action securely in the stock. To accomplish this, you'll need a good bedding job, preferably with pillars or another creep-free design. Torque them reasonably and consistently, and forget about it. If you find your action screws are dramatically impacting your rifle's accuracy, you might want to look into your stock and/or it's bedding job.
 

Attachments

  • rifle_action_diagram.png
    rifle_action_diagram.png
    10.1 KB · Views: 139
  • rifle_action_no_pillars.png
    rifle_action_no_pillars.png
    10.2 KB · Views: 150
  • rifle_action_forces.png
    rifle_action_forces.png
    12.6 KB · Views: 167
  • rifle_action_with_pillar_bedding.png
    rifle_action_with_pillar_bedding.png
    11.9 KB · Views: 192
Last edited by a moderator:
Thanks James...."King for the day"....excellent post!
 
Thanks enysse...

went on line to find information to help another forum member out...
 
Very clearly written and useful info, thanks James.
 
Thanks James I will book mark this page for future reference.

I took the 416 out to shoot I gained a bit. A perfectly vertical line 2" long. After the first shot I didn't see if it had hit the paper so I walked down to look, it had, so walked back shot #2, 1" low not bad I thought I can live with this then #3, 2" higher then #2.

I tried a different scope, checked all the mounting screws, so I still think it is in the bedding. It is piller bedded but is sits all around it not on it, this shouldn't be bad as it is a composite stock but not right.

I don't think I should do to much more until I talk to a smith, because if I take out to much it may have to be rebedded. This is probably what it needs but I would have to be without it another couple days. Then I have to have faith that it will be good when I get it back as I need to get the paperwork done as to the guns I'm going to take.

I shot my 375 RUM as I had also sent that to Wyatts first 2 touching the 3erd I couldn't see, walked down to the target it hit in the first hole, nice 1/2" group. So as long as my 375 gets across the pond I'll have a gun to shoot.

I"ll let you all know how the story unfolds.
 
JamieD

I sound like you have developed and issue...

You could CRTONICS your barrel...this is supper cooled to like -400 degrees to stabilize the metal in your rifle barrel. SOME -Serious competitors both pistol - rifleman and shotgun shooters do this to there equipment to obtain better results...however a fraction of a inch will win a competition and some people swear by it...it was the wave a number of years back to help competition clay-target shooters gain an upper edge...it you experienced a walking shotgun barrel this would reduce the movement while barrel walk was reduced to a minimum...it is available however id do not have the address at hand and you could look it up pand it is a very fact turn-around.

However in shotgun sports you shoot a large number of shells (100) in a short period of time (30 minutes) so to say and your shotgun barrel will reach temperatures where you will burn your hand if you grip the forearm in the wrong place (tang area) or barrel.


I have one for you to try..

Do you have any wax paper..Put a small piece by your front lug and action screw. Between the lug and stock...The thred above where the action screws are tightened as a very good gunsmith told me you do one turn at a time with each screw until they are snug then give then a 1/4 to 1/2 turn to each screw to make sure that they are both tight. the front one then the rear one...

are you using your sling and pulling on the sling?

Are you placing the barrel on the shooting bag? this will cause your barrel to walk up ward after the first shot...

Or are you placing the stock on the shooting bag?

See what that does...Or just go to a reputable gun smith...
 
Buy a CZ 550 American in .416 Rigby. Have a gunsmith shorten the barrel to 23" and add a barrel band for the sling, removing the forward sling swivel stud. Have him smooth the action and do a trigger job if needed (a crisp 4lbs on a DG rifle).

Shoot the heck out of it before you go.

P.S. Sell the Remington.
 

Forum statistics

Threads
53,624
Messages
1,131,397
Members
92,684
Latest member
KeithustKew


Latest posts

Latest profile posts

Impact shots from the last hunt

Early morning Impala hunt, previous link was wrong video

Headshot on jackal this morning

Mature Eland Bull taken in Tanzania, at 100 yards, with 375 H&H, 300gr, Federal Premium Expanding bullet.

20231012_145809~2.jpg
 
Top