
browningbbr
AH fanatic
- Joined
- Apr 6, 2009
- Messages
- 595
- Reaction score
- 384
- Location
- Southern Wisconsin, USA
- Media
- 32
- Member of
- SCI Badgerland Chapter, NRA, Local Sportsmen's Club
- Hunted
- South Africa, Tanzania
Selection of Knives & Equipment - Slaughtering & Boning
Virtually every one that hunts large game has at least one “hunting knife” of one sort or another that they carry into the field. Generally, these are heavy-bladed and have clip point or normal point blade shapes. In the last couple of decades, fixed-blade (sheath type) hunting knives have lost market share to quality folding knives with blade locking features. While hunting knives are handy tools to have in the field, they are not always optimum for slaughtering and butchering work. Additionally, most hunting knives have smooth handles and bolsters which can contribute to “stubbing” injuries (hand sliding up the knife to the blade) when hands are slippery with blood.
The purpose of this post is to suggest a few types of knives and some equipment to make butchering tasks easier, safer and more comfortable.
Knives
For all knives, the purchase of plastic handled, stainless steel commercial packing plant knives is recommended. These tools come with non-slip handles made from plastics or resins that will withstand high dishwasher temperatures.
For normal slaughtering and butchering operations, the purchase of 3-4 knives is recommended:
1. 5” straight boning knife (12.7 cm)
2. 5” curved boning knife (12.7 cm)
3. 6” beef skinning knife (15.24 cm)
4. 10” curved butcher’s knife (optional) (25.4 cm)
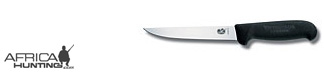
5” (12.7 cm) Straight Boning – Straight boning knifes are offered in lengths of 4 to 8”. They have a little stiffer blade than a curved boning knife and are particularly handy for the tasks of separating joints and cutting tendons at the origin or insertion ends of muscles. A 5” length is specifically recommended. This is because 4” knives are generally too short for boning of rounds (hind legs) or shoulders (front legs). 6” knives will usually lead to too much wrist fatigue for part time butchers because of the extra effort required at the handle to get the same pressure at the tip as when using a 5” knife. You can prove this to yourself by trying to cut a thick carrot in half with just the tip of a very short knife and a very long one. If both knives are equally sharp, you will find that you have use a lot more wrist torque with the longer knife. Over a period of 3 or 4 hours of boning work, this will lead to a sore wrist.
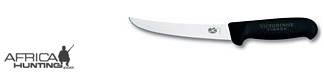
5” (12.7 cm) Curved Boning – Curved boning knives are offered in the same lengths as straight knives. For the same reasons cited above, a 5” length is recommended. Curved boning knives have a little more length to the blade edge, so you can make a longer cut with each draw. They are well-suited to the tasks of separating meat from long bones, flat bones and vertebrae. They are also very useful for skinning of the legs because of the small amount of exposed work area.
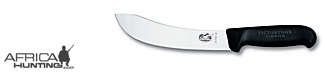
6” (15.24 cm) Beef Skinning – A beef skinning knife has a very curved blade with a blunted point. As with the curved boning knife, the curvature allows for longer cuts with each draw. The blunted point really helps reduce accidental punctures of potentially valuable trophy hides. Because skinning is a lower time percentage of the total butchering job, a 6” tool is OK here. Also, when properly done with a sharp knife, very little force has to be applied to separate the hide from the carcass.

10” (25.4 cm) Curved Butcher – If you will be doing a lot of steak cutting from the loin, short loin, sirloin or round, you may want to consider purchasing a 10” curved butchering knife. The long blade allows for long, deep cuts in a single draw. The same work can certainly be done with the 5” boning knife, but it will tend to leave a “choppy” surface on the steaks because multiple cuts are required to go all the way through. For professional looking steak cutting, a 10” curved butcher’s knife is nice to have.
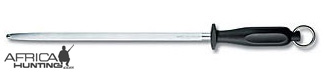
Steels
There are 4 primary types of knife sharpening steels:
• Smooth Steels
• Rough (sharpening) Steels
• Combination Steels
• Diamond Steels

Smooth Steels - If you look at the blade of a properly sharpened knife under a microscope, you will see that the edge looks very much like the edge of a feather. There is a row of very fine serrations at the thinnest part of the blade that act like saw teeth when cutting. If you are experienced and skilled enough to produce this very fine edge, then you probably only need to use a smooth steel. Smooth steels do not sharpen knives. They work by “truing up” the feather edge and realigning the “teeth”. Experienced meat cutters keep their smooth steels shiny bright and perfectly smooth with emery cloth and steel wool so that there are no imperfections that could interfere with the feather edge.

Rough (sharpening) Steels - The opposite of a smooth steel is a rough or “sharpening” steel. Rough steels have very fine grooves along the long axis of the tool. When a knife is drawn over the steel at the proper angle, it actually creates the feather edge noted above. Rough steels are a better choice for once-a-year butchers because they do produce a better-cutting tool more easily. The downside of a rough steel is that when used alone, the knife will never be quite as sharp as when trued on a smooth steel.
Combination Steels - Combination steels have 2 smooth and 2 rough faces in 180 degree opposition. To put a new edge on the knife, you draw it over the rough sides. To true a knife edge, you rotate the steel 90 degrees and draw over the smooth sides. If you have reasonable knife-sharpening skills and butchering experience, this is the recommended tool.

Diamond Steels - Diamond steels are truly a sharpening tool. Very fine industrial diamonds are embedded in the surface of the steel. Just a few passes on each side of the blade will produce a new cutting edge very quickly. If you are very inexperienced or have knives with very hard Rockwell-test metal (e.g. Buck Knives), you should consider a diamond steel.
Knife Sharpening
With all steels, proper technique is important: Hold the knife at a 30 degree angle to the steel and draw it slowly from hilt to tip. Repeat this on the other side of the blade. Speed or “looking like a real butcher” is not nearly as important as proper blade angle.

1. Hold the steel firmly in your left hand with the guard positioned to stop the blade should it slip. DO NOT PLACE FINGERS ABOVE GUARD!
2. Hold the knife in your right hand and place on top part of steel as shown.
3. Raise back of blade one-eight inch.
4. Now, moving the blade only, draw it across the steel in an arcing curve, pivoted at your wrist. The blade tip should leave the steel about two-thirds the way down.
5. Repeat the same action with the blade on the bottom side of the steel. Always maintain the same pressure and angle on both sides of the steel.
6. Repeat five or six times.
Saws
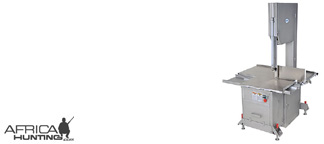
Commercial Band Saws - If you want to cut wild game carcasses into commonly known, bone-in meat cuts, you will need some kind of a meat saw. Commercial band saws used for meat are of stainless steel and aluminum construction. Even on the used market, the price can run well north of $1,000. There are a couple of companies offering small-format, meat band saws for the home butcher, but the construction is so light-duty, it’s hard to recommend them. Unless
you are cutting up venison for your entire neighborhood, you will want to consider purchasing a meat hand saw.

Meat Saws - Meat hand saws are constructed just like a hacksaw with a tensioned, thin blade. They are available in blade lengths of 17-30 inches. Costs range from $45 - $70. To have the widest range of use, select a saw that is 25 - 30” (63.5 - 76.2 cm). Blades are available with several options for “teeth per inch”. For a good general purpose blade, select 10 teeth per inch. They work well for:
• Separating the shoulder from the loin
• Separating the round from the sirloin
• Splitting the shoulder into the chuck and shank halves
• Splitting the loin from the sirloin
• Removing hocks
Splitting a carcass into right and left halves (down the center of the
backbone) can also be done with a meat hand saw. However, if you own a reciprocating saw (“Sawzall”) and have the experience to use it safely, it’s even easier. Just use a 10” (25.4 cm), 10 tooth-per-inch blade. Instead of taking 3-4 minutes to saw down the spine, you can do it in about 30 seconds.
Safety Equipment
All safety equipment noted here is recommended! This is even more important if you only kill and cut meat one or two times per year.
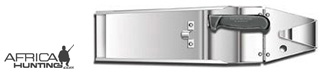
Knife Scabbard – A scabbard gives you a safe place to put your knives when you are not using them and keeps them within easy reach. Plastic scabbards only cost about $8 to 10. It’s cheap insurance to prevent injury. If you’ve ever gone into a commercial meat plant, you might have noticed that all of the meat cutters are wearing scabbards or have them attached to the side of their boning table. This is because the companies require it to prevent injury. They learned that leaving knives lying on the table will lead to accidental cuts.

Boning Glove – This is a cut-proof glove made of stainless steel mesh or Kevlar worn on the hand that does not hold the knife. Its value is obvious. The most common accidental knife cuts are on the left hands of right-handed guys and on the right hands of left-handed guys. Note that the Kevlar versions are less effective against stabbing, so don’t sharpen your knives to a stiletto point.
NOTE: NEVER wear a boning glove when running a meat band saw. Boning gloves are constructed of very strong materials that will not come apart. If the teeth of the band saw catch on the boning glove, your hand will be sucked right along with it.

Wrist Guard – This is worn on the wrist above the boning glove. Plastic “tube” guards and woven Kevlar versions are both available. The Kevlar version is a lot more comfortable, but is less effective against stabbing.

Knife Hand Glove – Same as Kevlar boning glove, but thinner so you can grasp the knife. These prevent “stubbing” injuries.

Belly Guard – This is a 20 x 20” (50.8 x 50.8 cm) cut-proof, stab-proof guard worn around the waist and fastened by an integral belt. Chain mail types are very expensive and hard to find. The ones made from cut-proof plastic belting are lower cost, more comfortable and just as effective. Cost is about $40, but what’s forty bucks compared to stabbing yourself in a femoral artery or doing an accidental sex change?
For every tool and piece of safety gear mentioned here, there are several reputable suppliers to the meat industry. I don’t want to recommend any specific companies. However, if you type bolded words into an internet search engine, you will not have any trouble finding places to purchase them.
Virtually every one that hunts large game has at least one “hunting knife” of one sort or another that they carry into the field. Generally, these are heavy-bladed and have clip point or normal point blade shapes. In the last couple of decades, fixed-blade (sheath type) hunting knives have lost market share to quality folding knives with blade locking features. While hunting knives are handy tools to have in the field, they are not always optimum for slaughtering and butchering work. Additionally, most hunting knives have smooth handles and bolsters which can contribute to “stubbing” injuries (hand sliding up the knife to the blade) when hands are slippery with blood.
The purpose of this post is to suggest a few types of knives and some equipment to make butchering tasks easier, safer and more comfortable.
Knives
For all knives, the purchase of plastic handled, stainless steel commercial packing plant knives is recommended. These tools come with non-slip handles made from plastics or resins that will withstand high dishwasher temperatures.
For normal slaughtering and butchering operations, the purchase of 3-4 knives is recommended:
1. 5” straight boning knife (12.7 cm)
2. 5” curved boning knife (12.7 cm)
3. 6” beef skinning knife (15.24 cm)
4. 10” curved butcher’s knife (optional) (25.4 cm)
5” (12.7 cm) Straight Boning – Straight boning knifes are offered in lengths of 4 to 8”. They have a little stiffer blade than a curved boning knife and are particularly handy for the tasks of separating joints and cutting tendons at the origin or insertion ends of muscles. A 5” length is specifically recommended. This is because 4” knives are generally too short for boning of rounds (hind legs) or shoulders (front legs). 6” knives will usually lead to too much wrist fatigue for part time butchers because of the extra effort required at the handle to get the same pressure at the tip as when using a 5” knife. You can prove this to yourself by trying to cut a thick carrot in half with just the tip of a very short knife and a very long one. If both knives are equally sharp, you will find that you have use a lot more wrist torque with the longer knife. Over a period of 3 or 4 hours of boning work, this will lead to a sore wrist.
5” (12.7 cm) Curved Boning – Curved boning knives are offered in the same lengths as straight knives. For the same reasons cited above, a 5” length is recommended. Curved boning knives have a little more length to the blade edge, so you can make a longer cut with each draw. They are well-suited to the tasks of separating meat from long bones, flat bones and vertebrae. They are also very useful for skinning of the legs because of the small amount of exposed work area.
6” (15.24 cm) Beef Skinning – A beef skinning knife has a very curved blade with a blunted point. As with the curved boning knife, the curvature allows for longer cuts with each draw. The blunted point really helps reduce accidental punctures of potentially valuable trophy hides. Because skinning is a lower time percentage of the total butchering job, a 6” tool is OK here. Also, when properly done with a sharp knife, very little force has to be applied to separate the hide from the carcass.
10” (25.4 cm) Curved Butcher – If you will be doing a lot of steak cutting from the loin, short loin, sirloin or round, you may want to consider purchasing a 10” curved butchering knife. The long blade allows for long, deep cuts in a single draw. The same work can certainly be done with the 5” boning knife, but it will tend to leave a “choppy” surface on the steaks because multiple cuts are required to go all the way through. For professional looking steak cutting, a 10” curved butcher’s knife is nice to have.
Steels
There are 4 primary types of knife sharpening steels:
• Smooth Steels
• Rough (sharpening) Steels
• Combination Steels
• Diamond Steels
Smooth Steels - If you look at the blade of a properly sharpened knife under a microscope, you will see that the edge looks very much like the edge of a feather. There is a row of very fine serrations at the thinnest part of the blade that act like saw teeth when cutting. If you are experienced and skilled enough to produce this very fine edge, then you probably only need to use a smooth steel. Smooth steels do not sharpen knives. They work by “truing up” the feather edge and realigning the “teeth”. Experienced meat cutters keep their smooth steels shiny bright and perfectly smooth with emery cloth and steel wool so that there are no imperfections that could interfere with the feather edge.
Rough (sharpening) Steels - The opposite of a smooth steel is a rough or “sharpening” steel. Rough steels have very fine grooves along the long axis of the tool. When a knife is drawn over the steel at the proper angle, it actually creates the feather edge noted above. Rough steels are a better choice for once-a-year butchers because they do produce a better-cutting tool more easily. The downside of a rough steel is that when used alone, the knife will never be quite as sharp as when trued on a smooth steel.
Combination Steels - Combination steels have 2 smooth and 2 rough faces in 180 degree opposition. To put a new edge on the knife, you draw it over the rough sides. To true a knife edge, you rotate the steel 90 degrees and draw over the smooth sides. If you have reasonable knife-sharpening skills and butchering experience, this is the recommended tool.
Diamond Steels - Diamond steels are truly a sharpening tool. Very fine industrial diamonds are embedded in the surface of the steel. Just a few passes on each side of the blade will produce a new cutting edge very quickly. If you are very inexperienced or have knives with very hard Rockwell-test metal (e.g. Buck Knives), you should consider a diamond steel.
Knife Sharpening
With all steels, proper technique is important: Hold the knife at a 30 degree angle to the steel and draw it slowly from hilt to tip. Repeat this on the other side of the blade. Speed or “looking like a real butcher” is not nearly as important as proper blade angle.
1. Hold the steel firmly in your left hand with the guard positioned to stop the blade should it slip. DO NOT PLACE FINGERS ABOVE GUARD!
2. Hold the knife in your right hand and place on top part of steel as shown.
3. Raise back of blade one-eight inch.
4. Now, moving the blade only, draw it across the steel in an arcing curve, pivoted at your wrist. The blade tip should leave the steel about two-thirds the way down.
5. Repeat the same action with the blade on the bottom side of the steel. Always maintain the same pressure and angle on both sides of the steel.
6. Repeat five or six times.
Saws
Commercial Band Saws - If you want to cut wild game carcasses into commonly known, bone-in meat cuts, you will need some kind of a meat saw. Commercial band saws used for meat are of stainless steel and aluminum construction. Even on the used market, the price can run well north of $1,000. There are a couple of companies offering small-format, meat band saws for the home butcher, but the construction is so light-duty, it’s hard to recommend them. Unless
you are cutting up venison for your entire neighborhood, you will want to consider purchasing a meat hand saw.
Meat Saws - Meat hand saws are constructed just like a hacksaw with a tensioned, thin blade. They are available in blade lengths of 17-30 inches. Costs range from $45 - $70. To have the widest range of use, select a saw that is 25 - 30” (63.5 - 76.2 cm). Blades are available with several options for “teeth per inch”. For a good general purpose blade, select 10 teeth per inch. They work well for:
• Separating the shoulder from the loin
• Separating the round from the sirloin
• Splitting the shoulder into the chuck and shank halves
• Splitting the loin from the sirloin
• Removing hocks
Splitting a carcass into right and left halves (down the center of the
backbone) can also be done with a meat hand saw. However, if you own a reciprocating saw (“Sawzall”) and have the experience to use it safely, it’s even easier. Just use a 10” (25.4 cm), 10 tooth-per-inch blade. Instead of taking 3-4 minutes to saw down the spine, you can do it in about 30 seconds.
Safety Equipment
All safety equipment noted here is recommended! This is even more important if you only kill and cut meat one or two times per year.
Knife Scabbard – A scabbard gives you a safe place to put your knives when you are not using them and keeps them within easy reach. Plastic scabbards only cost about $8 to 10. It’s cheap insurance to prevent injury. If you’ve ever gone into a commercial meat plant, you might have noticed that all of the meat cutters are wearing scabbards or have them attached to the side of their boning table. This is because the companies require it to prevent injury. They learned that leaving knives lying on the table will lead to accidental cuts.
Boning Glove – This is a cut-proof glove made of stainless steel mesh or Kevlar worn on the hand that does not hold the knife. Its value is obvious. The most common accidental knife cuts are on the left hands of right-handed guys and on the right hands of left-handed guys. Note that the Kevlar versions are less effective against stabbing, so don’t sharpen your knives to a stiletto point.
NOTE: NEVER wear a boning glove when running a meat band saw. Boning gloves are constructed of very strong materials that will not come apart. If the teeth of the band saw catch on the boning glove, your hand will be sucked right along with it.
Wrist Guard – This is worn on the wrist above the boning glove. Plastic “tube” guards and woven Kevlar versions are both available. The Kevlar version is a lot more comfortable, but is less effective against stabbing.
Knife Hand Glove – Same as Kevlar boning glove, but thinner so you can grasp the knife. These prevent “stubbing” injuries.
Belly Guard – This is a 20 x 20” (50.8 x 50.8 cm) cut-proof, stab-proof guard worn around the waist and fastened by an integral belt. Chain mail types are very expensive and hard to find. The ones made from cut-proof plastic belting are lower cost, more comfortable and just as effective. Cost is about $40, but what’s forty bucks compared to stabbing yourself in a femoral artery or doing an accidental sex change?
For every tool and piece of safety gear mentioned here, there are several reputable suppliers to the meat industry. I don’t want to recommend any specific companies. However, if you type bolded words into an internet search engine, you will not have any trouble finding places to purchase them.
Last edited by a moderator: