browningbbr
AH fanatic
- Joined
- Apr 6, 2009
- Messages
- 595
- Reaction score
- 384
- Location
- Southern Wisconsin, USA
- Media
- 32
- Member of
- SCI Badgerland Chapter, NRA, Local Sportsmen's Club
- Hunted
- South Africa, Tanzania
Butchering of Wild Game
I was a little hesitant to take on the task of doing a post on butchering of wild game. Not because I didn't want to do it or that it would take a long time, it's just that proper butchering techniques are so hard to describe. Typically, this is a learn-by-seeing and then learn-by-doing effort. That being said, I will do my best to put it into words?
- @browningbbr
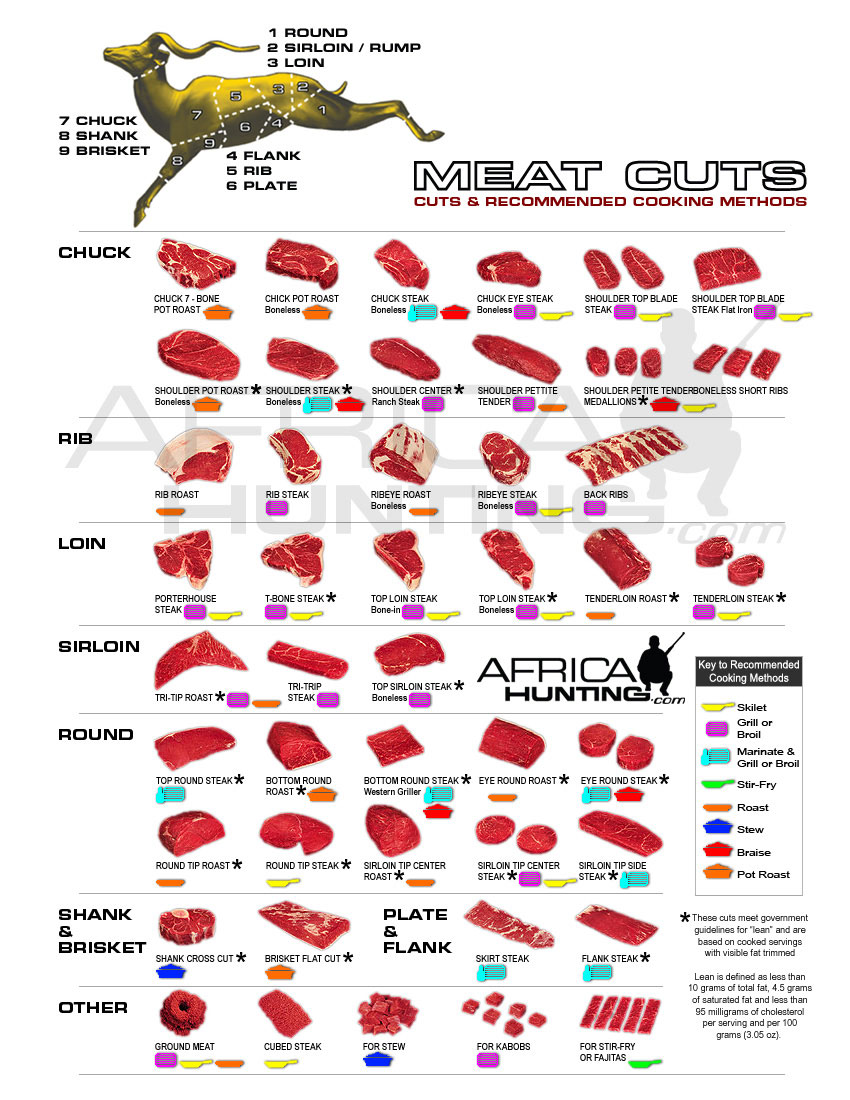
For the purposes of this post, it is assumed that the meat from the carcass you are butchering will be used for steaks, roasts, chops and hamburger. It's also assumed that the steps and procedures in the posts entitled Proper Meat Preparation The First Hour and Aging Meat & Freezing Meat have been followed. Finally, we'll assume that the meat will NOT be used for sausage or jerky.
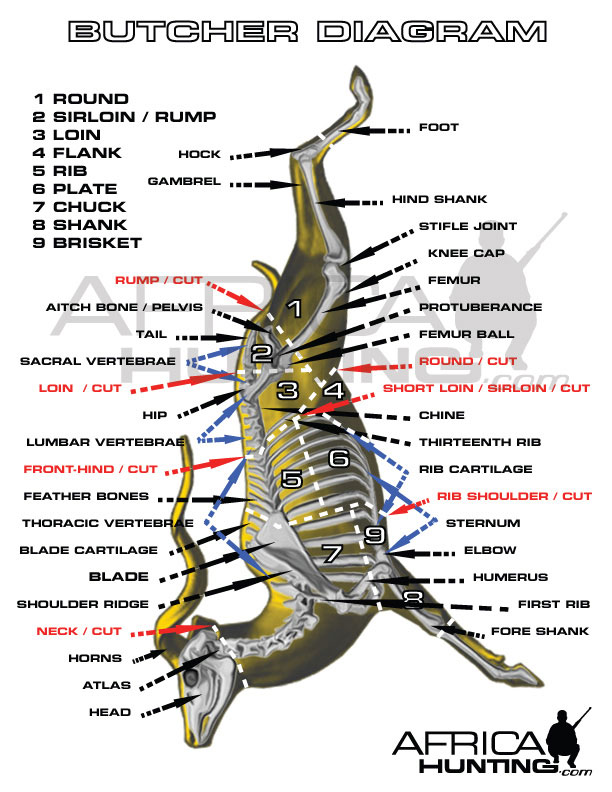
If you ARE planning to use any of the meat from the carcass for sausage or jerky, it is highly recommended that you perform the butchering operations right after the carcass has chilled for the initial 24 hours. Meat cuts removed for sausage or jerky should be processed within 3 days after butchering. Any remaining primal cuts (items 1-8 in the "Butcher Diagram" below) that you wish to age can be re-hung in the cooler and aged as described in the posts mentioned in the previous paragraph.

If you are a first-time butcher, it's also recommended that you read the post about Selection of Knives & Equipment - Slaughtering & Boning paying particular attention to the safety gear described there! It's better to be safe than sorry.
STEP ONE "VISUALIZE" THE SKELETON
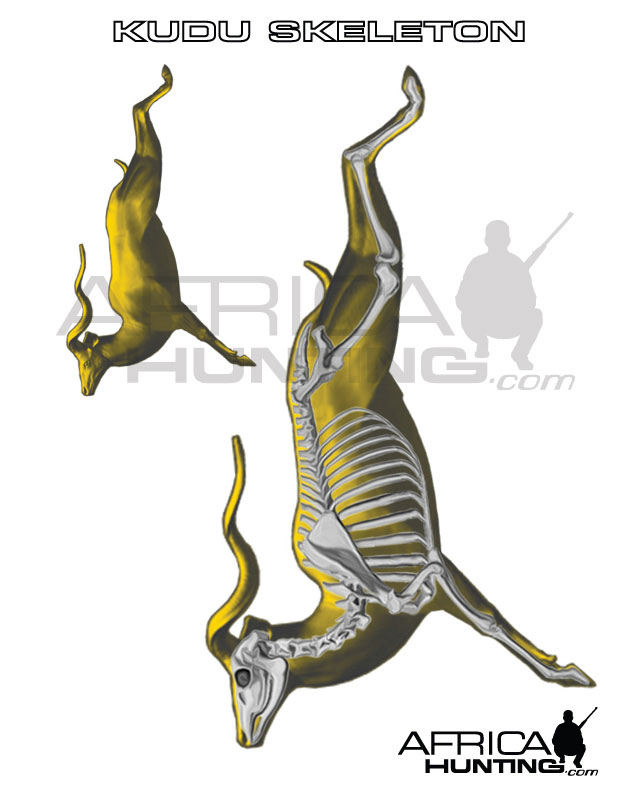
The primal (major) cuts of the carcass are mostly determined by the orientation of bones and muscles in the carcass. The bones are the reference points that are used to determine where and how to make the separations. The picture below entitled "Kudu Skeleton" shows the location of the bones after a carcass has been properly hung for chilling. Being able to picture the arrangement of bones in your mind really helps when trying to make a cut in the right place.
STEP TWO SPLIT THE CARCASS
The carcass should first be split in half by cutting down the center of the spinal column with a meat saw. This can also be accomplished quickly by using a Sawzall with a long, 10 tooth-per-inch blade. While standing so that the animal's back is facing you, start at the dock of the tail and cut toward the neck.
Be careful to make an accurate split and stay centered on the vertebrae ("chine") bones. Deviating to either side could potentially cut into the loin muscle and ruin steaks or chops. Making a good split is much easier if you can recruit someone to hold the front legs steady.
Once the carcass is split, it's the easiest time to remove the spinal cord. If the entire spinal cord is visible, you did an excellent job of splitting the carcass.
For the remaining steps, please refer to the Butchering Diagram below that shows the bones AND cut lines.

STEP THREE SEPARATE THE SHOULDER
The "shoulder" is comprised of the brisket, shank and chuck (cuts 7, 8 and 9) shown in the Butchering Diagram. To separate these primal cuts from the carcass, follow these steps:
- Lay one side of the split carcass on the cutting table with the exterior surface of the carcass laying down
- Locate the last rib (farthest from the head) and count ribs toward the head until you find the space between ribs 8 and 9
- From the inside of the carcass, stick your boning knife through the meat between ribs 8 and 9
- Grab the foreleg and tip the carcass up so your knife tip is off of the table
- Cut down toward the brisket (following the line of the ribs) and through the sternum
- Go back to the original knife hole and cut up toward the spinal column until your knife touches the tip of the shoulder blade.
- Visually follow the 8th and 9th ribs up to the spinal column and locate the vertebrae that they connect to. Now find the "feather bones" (short bones sticking up from the spinal column) that correspond to the vertebrae you located
- Using your boning knife, make a cut through the loin muscle to the spinal column following the line between the feather bones you just located
- Turn the side of the carcass over so the outside is laying "up"
- Using your meat saw, make a cut through the spinal column and shoulder blade tip that connects the 2 knife cuts that you just made
- The shoulder is now separated keep it on your boning table and set the balance of the carcass aside for now
STEP FOUR SEPARATE THE SHANK & BRISKET
- Lay the shoulder on your boning table with the outside of the carcass facing up
- Refer to the Butchering Diagram and find the "pocket" formed by the foreleg at the brisket (if you follow the line between the 7 and the 9 down to the edge of the carcass, you'll find it)
- Using your meat saw, make a cut that is perpendicular to the spinal column from the pocket of the foreleg this separates the brisket and shank from the chuck
STEP FIVE SPLIT THE BRISKET AND SHANK
- Rotate the separated brisket-shank so that the cut you just made is laying flat on the table
- Grab the foreleg with one hand and use the other hand to "push" the brisket away from the leg with enough pressure, you will see a connective tissue seam start to separate between these two sub-primal cuts
- Using your boning knife, cut the sub-primals apart by following the connective tissue seam
- Bone out or trim the shank and brisket per the meat cuts that you desire
STEP SIX CUT THE ROASTS FROM THE CHUCK / REMOVE NECK ROAST
- Lay the chuck on your boning table with the outside facing up and with the cut you made to separate the brisket-shank from the chuck facing you
- With your meat saw, cut 1-3 (depending on thickness) "7-bone" roasts by cutting parallel to the cut you made to separate the shoulder from the rest of the carcass (they are called "7-bone roasts" because the shoulder blade and the shoulder blade ridge form the number "7" when properly cut)
- After removing 7-bone roasts, rotate the chuck 90 degrees and using your meat saw, make 1-3 cuts (depending on thickness) off of the side of the chuck where the brisket/shank was attached these are called "arm roasts" for obvious reasons
- NOTE: with a large carcass, you may be able to cut more 7-bone and arm roasts, with a small carcass, you may be able to cut less it depends on how thick you cut them
- With the chuck laying on the boning table with the outside facing up, make a cut with your meat saw perpendicular to the cervical (neck) vertebrae just forward of the point of the shoulder blade (left and below the number "8" in the diagram) this separates the neck roast from the chuck
- The remainder of the chuck can be boned out or kept as a bone-in roast
STEP SEVEN SEPARATE THE RIB
- Put the remainder of the carcass on your boning table with outside of the carcass facing down
- Find the last two ribs and stick your boning knife through the meat between them
- Tip the carcass up so your knife tip is off of the table
- Cut down toward the belly line (following the line of the ribs) and all the way through to the belly line
- Go back to the original knife hole and cut up toward the spinal column until your knife touches bone
- Visually follow the last 2 ribs up to the spinal column and locate the vertebrae that they connect to. Now find the "feather bones" (short bones sticking up from the spinal column) that correspond to the vertebrae you located
- Using your boning knife, make a cut through the loin muscle to the spinal column following the line between the feather bones you just located
- Turn the side of the carcass over so the outside is laying "up"
- Using your meat saw, make a cut through the spinal column and shoulder blade tip that connects the 2 knife cuts that you just made
- The rib is now separated keep it on your boning table and set the balance of the carcass aside for now
STEP EIGHT SEPARATE THE RIB FROM THE PLATE
- Lay the rib-plate on your boning table with the outside facing up
- With your finger tips, feel along the rib bones and find where they make a sharp bend in toward the bottom of the spinal column (this is just above the mid-way point between the belly line and the top of the carcass)
- With your meat saw, make a cut parallel to the spinal column that is one inch below the bend in the rib bones cutting in the right place is important, if you cut too high on the carcass, you will ruin some of the valuable loin meat if you are in doubt about where to cut, move your cutting line closer to the belly line to avoid ruining the loins
- The plate can be kept intact for use in barbeque or can be boned out for burger
STEP NINE CUT CHOPS OR STEAKS FROM THE RIB
- NOTE: "chops" and "steaks" are essentially the same thing use of the term depends on the animal they are cut from if it's pork, it's a "chop" if it's beef, it's a "steak" if it's venison, it's for dinner!
- Determine how thick you want to cut your steaks or chops
- Lay the rib on your boning table with the feather bones pointing up
- With your meat saw, make cuts down through the loin (perpendicular to the table) to separate the steaks/chops
STEP TEN REMOVE THE FLANK
- Lay the remainder of the carcass on the boning table with the outside facing down
- Visually follow the line of the leg from the knee cap to the belly along the front side of the leg
- Using your boning knife, remove the flank by cutting into the belly meat following the knee cap-to-belly line
- If you desire, you can peel the flank steak out of the flank by separating along the connective tissue line
STEP ELEVEN SEPARATE THE ROUND FROM THE RUMP
- Lay the loin-rump-round portion of the carcass on the boning table with the outside facing up
- With your finger tips, find the "point" of the hip bone (just to the right of the number "2" in the butchering diagram)
- From the point of the hip bone, move 2 inches toward the knee cap and make a mark in the meat with your boning knife
- Using your meat saw, make a cut perpendicular to the long axis of the femur (largest bone in the leg next to the number "1" in the diagram) all the way through the hind quarter to make the separation
STEP TWELVE SEPARATE THE HIND SHANK FROM THE ROUND
- Lay the round on the boning table with the outside facing up
- With your finger tips, find the knee cap
- From the side of the knee cap, go one inch to the exterior surface of the leg and probe with your knife point until it enters the joint between the femur and the tibia
- Using the tip of the knife, separate the joint and cut through the meat to separate the hind shank from the round
- Sorry, this is a lot easier to do than to describe
STEP THIRTEEN CUT ROUND STEAKS OR ROASTS
- Determine how thick you want to cut steaks or roasts from the round
- With the round still laying with the outside facing up, make cuts with your meat saw parallel to cut that separated the round from the loin-sirloin depending on the size of the carcass and thickness of cut, 1-5 steaks/roasts can be removed
- The remainder of the round can be used for bone-in roast or boned out for burger
STEP FOURTEEN SEPARATE THE LOIN FROM THE RUMP
- Lay the loin-rump on the boning table with the outside facing up
- Again locate the "point" of the hip bone
- Go one inch forward (toward the head) from the point of the hip bone and make a mark in the meat with your boning knife
- Using your meat saw, make a cut at your knife mark that is parallel to the cut that separated the loin from the rib
STEP FIFTEEN CUT STEAKS OR CHOPS FROM THE LOIN
- Determine how thick you want to cut your steaks or chops
- Lay the loin on your boning table with the feather bones pointing up
- With your meat saw, make cuts down through the loin (perpendicular to the table) to separate the steaks/chops
When the carcass is separated in this manner, it's difficult to cut steaks from the rump. The rump can be bone-in for roasting or can be boned out for burger.
I was a little hesitant to take on the task of doing a post on butchering of wild game. Not because I didn't want to do it or that it would take a long time, it's just that proper butchering techniques are so hard to describe. Typically, this is a learn-by-seeing and then learn-by-doing effort. That being said, I will do my best to put it into words?
- @browningbbr
For the purposes of this post, it is assumed that the meat from the carcass you are butchering will be used for steaks, roasts, chops and hamburger. It's also assumed that the steps and procedures in the posts entitled Proper Meat Preparation The First Hour and Aging Meat & Freezing Meat have been followed. Finally, we'll assume that the meat will NOT be used for sausage or jerky.
If you ARE planning to use any of the meat from the carcass for sausage or jerky, it is highly recommended that you perform the butchering operations right after the carcass has chilled for the initial 24 hours. Meat cuts removed for sausage or jerky should be processed within 3 days after butchering. Any remaining primal cuts (items 1-8 in the "Butcher Diagram" below) that you wish to age can be re-hung in the cooler and aged as described in the posts mentioned in the previous paragraph.
If you are a first-time butcher, it's also recommended that you read the post about Selection of Knives & Equipment - Slaughtering & Boning paying particular attention to the safety gear described there! It's better to be safe than sorry.
STEP ONE "VISUALIZE" THE SKELETON
The primal (major) cuts of the carcass are mostly determined by the orientation of bones and muscles in the carcass. The bones are the reference points that are used to determine where and how to make the separations. The picture below entitled "Kudu Skeleton" shows the location of the bones after a carcass has been properly hung for chilling. Being able to picture the arrangement of bones in your mind really helps when trying to make a cut in the right place.
STEP TWO SPLIT THE CARCASS
The carcass should first be split in half by cutting down the center of the spinal column with a meat saw. This can also be accomplished quickly by using a Sawzall with a long, 10 tooth-per-inch blade. While standing so that the animal's back is facing you, start at the dock of the tail and cut toward the neck.
Be careful to make an accurate split and stay centered on the vertebrae ("chine") bones. Deviating to either side could potentially cut into the loin muscle and ruin steaks or chops. Making a good split is much easier if you can recruit someone to hold the front legs steady.
Once the carcass is split, it's the easiest time to remove the spinal cord. If the entire spinal cord is visible, you did an excellent job of splitting the carcass.
For the remaining steps, please refer to the Butchering Diagram below that shows the bones AND cut lines.
STEP THREE SEPARATE THE SHOULDER
The "shoulder" is comprised of the brisket, shank and chuck (cuts 7, 8 and 9) shown in the Butchering Diagram. To separate these primal cuts from the carcass, follow these steps:
- Lay one side of the split carcass on the cutting table with the exterior surface of the carcass laying down
- Locate the last rib (farthest from the head) and count ribs toward the head until you find the space between ribs 8 and 9
- From the inside of the carcass, stick your boning knife through the meat between ribs 8 and 9
- Grab the foreleg and tip the carcass up so your knife tip is off of the table
- Cut down toward the brisket (following the line of the ribs) and through the sternum
- Go back to the original knife hole and cut up toward the spinal column until your knife touches the tip of the shoulder blade.
- Visually follow the 8th and 9th ribs up to the spinal column and locate the vertebrae that they connect to. Now find the "feather bones" (short bones sticking up from the spinal column) that correspond to the vertebrae you located
- Using your boning knife, make a cut through the loin muscle to the spinal column following the line between the feather bones you just located
- Turn the side of the carcass over so the outside is laying "up"
- Using your meat saw, make a cut through the spinal column and shoulder blade tip that connects the 2 knife cuts that you just made
- The shoulder is now separated keep it on your boning table and set the balance of the carcass aside for now
STEP FOUR SEPARATE THE SHANK & BRISKET
- Lay the shoulder on your boning table with the outside of the carcass facing up
- Refer to the Butchering Diagram and find the "pocket" formed by the foreleg at the brisket (if you follow the line between the 7 and the 9 down to the edge of the carcass, you'll find it)
- Using your meat saw, make a cut that is perpendicular to the spinal column from the pocket of the foreleg this separates the brisket and shank from the chuck
STEP FIVE SPLIT THE BRISKET AND SHANK
- Rotate the separated brisket-shank so that the cut you just made is laying flat on the table
- Grab the foreleg with one hand and use the other hand to "push" the brisket away from the leg with enough pressure, you will see a connective tissue seam start to separate between these two sub-primal cuts
- Using your boning knife, cut the sub-primals apart by following the connective tissue seam
- Bone out or trim the shank and brisket per the meat cuts that you desire
STEP SIX CUT THE ROASTS FROM THE CHUCK / REMOVE NECK ROAST
- Lay the chuck on your boning table with the outside facing up and with the cut you made to separate the brisket-shank from the chuck facing you
- With your meat saw, cut 1-3 (depending on thickness) "7-bone" roasts by cutting parallel to the cut you made to separate the shoulder from the rest of the carcass (they are called "7-bone roasts" because the shoulder blade and the shoulder blade ridge form the number "7" when properly cut)
- After removing 7-bone roasts, rotate the chuck 90 degrees and using your meat saw, make 1-3 cuts (depending on thickness) off of the side of the chuck where the brisket/shank was attached these are called "arm roasts" for obvious reasons
- NOTE: with a large carcass, you may be able to cut more 7-bone and arm roasts, with a small carcass, you may be able to cut less it depends on how thick you cut them
- With the chuck laying on the boning table with the outside facing up, make a cut with your meat saw perpendicular to the cervical (neck) vertebrae just forward of the point of the shoulder blade (left and below the number "8" in the diagram) this separates the neck roast from the chuck
- The remainder of the chuck can be boned out or kept as a bone-in roast
STEP SEVEN SEPARATE THE RIB
- Put the remainder of the carcass on your boning table with outside of the carcass facing down
- Find the last two ribs and stick your boning knife through the meat between them
- Tip the carcass up so your knife tip is off of the table
- Cut down toward the belly line (following the line of the ribs) and all the way through to the belly line
- Go back to the original knife hole and cut up toward the spinal column until your knife touches bone
- Visually follow the last 2 ribs up to the spinal column and locate the vertebrae that they connect to. Now find the "feather bones" (short bones sticking up from the spinal column) that correspond to the vertebrae you located
- Using your boning knife, make a cut through the loin muscle to the spinal column following the line between the feather bones you just located
- Turn the side of the carcass over so the outside is laying "up"
- Using your meat saw, make a cut through the spinal column and shoulder blade tip that connects the 2 knife cuts that you just made
- The rib is now separated keep it on your boning table and set the balance of the carcass aside for now
STEP EIGHT SEPARATE THE RIB FROM THE PLATE
- Lay the rib-plate on your boning table with the outside facing up
- With your finger tips, feel along the rib bones and find where they make a sharp bend in toward the bottom of the spinal column (this is just above the mid-way point between the belly line and the top of the carcass)
- With your meat saw, make a cut parallel to the spinal column that is one inch below the bend in the rib bones cutting in the right place is important, if you cut too high on the carcass, you will ruin some of the valuable loin meat if you are in doubt about where to cut, move your cutting line closer to the belly line to avoid ruining the loins
- The plate can be kept intact for use in barbeque or can be boned out for burger
STEP NINE CUT CHOPS OR STEAKS FROM THE RIB
- NOTE: "chops" and "steaks" are essentially the same thing use of the term depends on the animal they are cut from if it's pork, it's a "chop" if it's beef, it's a "steak" if it's venison, it's for dinner!
- Determine how thick you want to cut your steaks or chops
- Lay the rib on your boning table with the feather bones pointing up
- With your meat saw, make cuts down through the loin (perpendicular to the table) to separate the steaks/chops
STEP TEN REMOVE THE FLANK
- Lay the remainder of the carcass on the boning table with the outside facing down
- Visually follow the line of the leg from the knee cap to the belly along the front side of the leg
- Using your boning knife, remove the flank by cutting into the belly meat following the knee cap-to-belly line
- If you desire, you can peel the flank steak out of the flank by separating along the connective tissue line
STEP ELEVEN SEPARATE THE ROUND FROM THE RUMP
- Lay the loin-rump-round portion of the carcass on the boning table with the outside facing up
- With your finger tips, find the "point" of the hip bone (just to the right of the number "2" in the butchering diagram)
- From the point of the hip bone, move 2 inches toward the knee cap and make a mark in the meat with your boning knife
- Using your meat saw, make a cut perpendicular to the long axis of the femur (largest bone in the leg next to the number "1" in the diagram) all the way through the hind quarter to make the separation
STEP TWELVE SEPARATE THE HIND SHANK FROM THE ROUND
- Lay the round on the boning table with the outside facing up
- With your finger tips, find the knee cap
- From the side of the knee cap, go one inch to the exterior surface of the leg and probe with your knife point until it enters the joint between the femur and the tibia
- Using the tip of the knife, separate the joint and cut through the meat to separate the hind shank from the round
- Sorry, this is a lot easier to do than to describe
STEP THIRTEEN CUT ROUND STEAKS OR ROASTS
- Determine how thick you want to cut steaks or roasts from the round
- With the round still laying with the outside facing up, make cuts with your meat saw parallel to cut that separated the round from the loin-sirloin depending on the size of the carcass and thickness of cut, 1-5 steaks/roasts can be removed
- The remainder of the round can be used for bone-in roast or boned out for burger
STEP FOURTEEN SEPARATE THE LOIN FROM THE RUMP
- Lay the loin-rump on the boning table with the outside facing up
- Again locate the "point" of the hip bone
- Go one inch forward (toward the head) from the point of the hip bone and make a mark in the meat with your boning knife
- Using your meat saw, make a cut at your knife mark that is parallel to the cut that separated the loin from the rib
STEP FIFTEEN CUT STEAKS OR CHOPS FROM THE LOIN
- Determine how thick you want to cut your steaks or chops
- Lay the loin on your boning table with the feather bones pointing up
- With your meat saw, make cuts down through the loin (perpendicular to the table) to separate the steaks/chops
When the carcass is separated in this manner, it's difficult to cut steaks from the rump. The rump can be bone-in for roasting or can be boned out for burger.
Last edited by a moderator: