
- Joined
- Oct 1, 2007
- Messages
- 13,082
- Reaction score
- 9,180
- Website
- www.africahunting.com
- Media
- 5,597
- Articles
- 321

by John Bellucci, Master Taxidermist
“Possibly the most important thing to remember is to treat the animal as quickly as possible!”
“Jambo, Bwana!” Here I will concentrate on the concerns of getting your overseas trophies properly prepared to help ensure the best trophy mount possible. There is an old adage in the Taxidermy industry… “A beautiful mount begins in the field.” This, of course, refers to the proper care of the specimen in the field that results in a beautiful mount later on.
The biggest set of potential problems and complaints seem to come about with trophy animals taken from the plains and savannas of Africa. There are a seeming abundance of guides and outfitters that hire “only the worst” when it comes to this type of service. Fortunately, there are many exceptions! However, more often than not, if you - the hunter - are not aware of proper procedure, the only thing you will have from your hard-earned hunt is memories. And not the ones that come to you when you view your prized trophy in its place of honor!
The proper procedures of foreign field-care, ultimately result in a beautiful trophy mount and happy memories of the entire event… with that in mind, I humbly submit this information.
I begin with basics you can use to determine if the skinners are doing a good job. Possibly the most important thing to remember is to treat the animal as quickly as possible! Sure, you can take a couple of photos of yourself with your trophy, but bear in mind the heat of the day. This is the primary reason skins spoil!
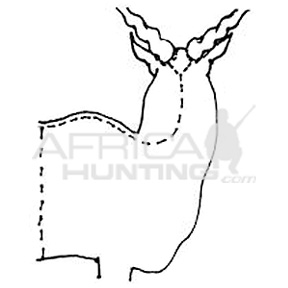
Before a knife even touches animal, some basic measurements taken now will provide the taxidermist with invaluable information later. The major measurements of concern are: tip of the nose - to front corner of the eye; tip of the nose - to the back of the skull; front corner of the eye - to the front base of the horn; width of the eyes - at both the front corners and rear edge; and, if possible, circumference of the neck - to just below the ears and again about 3-inches further down the neck (these neck measurements are more accurately taken after skinning). These are the measurements needed for purchasing the proper sized headform for the mount, and they take but minutes to record!
In addition to these headform measurements, additional measurements are required for a full or “Lifesize” mount. The first important measurement, the overall length of the animal, is measured from the tip of the nose - to the base or “root” of the tail… following the contour of the back. This measurement is taken while the skin is still on the specimen. Next in importance is the length of the hind leg from the bottom of the foot or hoof (as it would be posed standing), up to the point of the hock (the rear heel of the animal). Another measurement is from the bottom of the front foot or hoof as it would be posed standing, up to the first joint of the “knee” and another measured further up to include the point of the “elbow”… as well as the overall height at the shoulder.
All other body measurements can be taken off the skinned carcass. These would include the circumferences of the chest behind the forelegs, around the mid-chest (the “mid-drift”), and around the abdomen. Also, record the circumference of the neck in front of the shoulders, behind the ears, and around the middle. Finally, record the depth of the torso from the top-line to the belly-line, the thickness through the body at the head of Humerus, from head of Humerus to head of Femur, the head of brisket to the head of Femur, and the length of tail. These measurements are the important “field measurements” needed for a full mounted trophy.
To begin the skinning procedure, make a cut from the middle/rear base of one horn toward the rear point of the back of the skull. When this is done, repeat this step on the other side of the head. Note: It is best if these initial cuts are made with the edge of the blade facing up - away from the hairs… This method allows less chance of actually slicing through any of the hairs!
After the two opening cuts meet at the back of the skull, run a long opening incision down the center of the topside of the neck and continue past the shoulders. Today's headforms have much more shoulders on them than headforms of years past, and pedestal mountings can require even more of a rearward portion of the hide! Many times I suggest to clients that they instruct the skinners to skin as far as the middle of the animals back, insuring plenty of hide in case a pedestal mount is desired. After opening as far back as needed, the skin surrounding the chest area is cut through, encircling the animal from one side of the opening cut around to the other.
Be sure the throat of the animal is never cut… for any reason!
After all opening cuts are made, skinning proceeds forward and up the shoulders and neck. As the skin is pulled forward, the connective white tissue is all that should be sliced through to remove the hide from the meat of the carcass. This assures there will be no knife nicks in the skin. There is no reason for them!
Skinning continues until the bases of the ears are reached. Skin up over the base of the ears by pulling the skin forward until the creamy-yellowish ear cartilage is seen. Always make sure the muscles of the ear bases - the “ear butts” - are cut through at their point of attachment right at the skull. Never let the ears be cut further up the ear muscles. This practice creates a horribly wide ear opening and it cuts through the front notch or “V” of the front of the ear.
After freeing the ears from the skull, the skin must be carefully cut from around the horns. A screwdriver is sometimes a very useful assist in prying the skin loose from around the horns without cutting the skin.
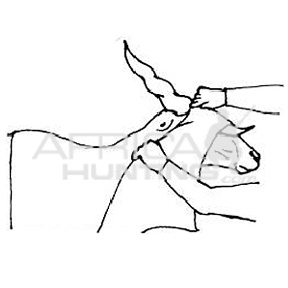
Continue forward down the skull, being careful not to cut through the skin, especially around the eyes. To preserve the eyelids intact, the “free” hand - the hand without the knife - acts as a guide from the outside of the skin, so you feel that you are not cutting into the lids. Reverse the skin and, from the outside, put a forefinger under the rear edge of the eyelid and lift up; then from the skin side cut through this thin skin-tissue close to the bone surrounding the eye until the forward corner of the eye is reached. Now cut very close to the bone and continue to do so until the tear duct is freed… on animals that have a tear duct!
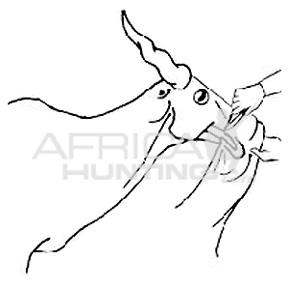
Skin down the face until nearing the rear corners of the mouth. Again, from the outside insert your forefinger in the corner of the mouth and pull up, giving tension to the cheek muscles. Cut through the cheek muscles about one-inch from the corner of the mouth, and free the skin of the lower lip from the jaw by cutting close to the bone. Free the upper lip and nose, cutting close to the bone, in the same manner. As with the eye, your forefinger may also be placed as a guide in the nostril when skinning down over the nose cartilage and cutting through to finally free the skin from the skull.
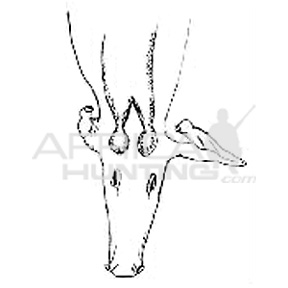
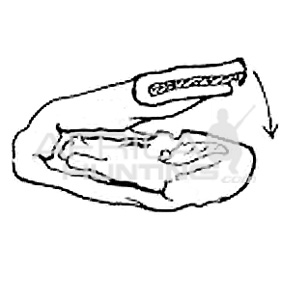
With the skin, or “cape”, removed, now it is time for the important details to be tended to. The ears must be turned inside out, using the thumbs as wedges to assist in this step. They must be worked very nearly to the tips and sides, but great care must be taken not to break through the edges. The actual ear cartilage remains attached to the front ear skins here. All remaining red meat is removed from the ear cartilages, leaving the full “bowl” (rounded base of ear cartilage) of the ears intact. Proper salting will preserve these parts… don't let anyone tell you otherwise! Proper turning of the ears is paramount to preserving them, thus producing well-mounted ears. This drawing shows one ear fully turned and one ear just begun.
The lips are opened (or “split”) by holding the outer surfaces - the hair-side and the textured “gum-side” - between the thumb and forefinger while slitting the inner flesh with a knife so they will lay open… as you would butterfly shrimp. The edges of the lower lip at the front should also be opened in this manner, and with extreme care to avoid cutting through these narrow walls. Surplus fat and flesh should be removed from the skin for best results.
Get the skin off and salted with the least possible delay. If you are in hot country where the skin may be a long time in coming to camp for salting, it is wise to arrange to have some salt carried with you so, as the trophy is skinned, salt may be applied to the surface and continued frequently until the skin is completely removed. By the time the skin is off, the salt has started its valuable work and the safety of this trophy is assured!
Salted skins are less apt to be attacked by insects and mice than those cured by drying only. Common, non-iodized table salt is the one best thing to apply to any and all skins, and there is no danger of using too much. While skinning, or after skinning, the flesh side should not be allowed to become dry, as it will not take the salt. The skin should be spread on the ground, flesh side up - preferably on a tarp or canvas - the edges opened and stretched, and liberally sprinkled with salt. The salt supply should always be kept dry... the drier it is the better it draws liquids from the skin.
The salt should be well rubbed into every part of the skin with the flat of the hand, and the skin folded, flesh sides together, placed in a shady place on a slanting platform, allowing the initial fluids to drain away. After eight to twelve hours, the skin can be unrolled, the old salt scraped off, and a new dry layer of salt rubbed into all areas of the skin again. Be sure no wrinkles form in the skin that will not allow the salt to reach them. Salt must be in contact with all areas of the flesh-side of the skin.
This can be followed up with an additional salting or two, until the skin is dry enough but still able to be folded for shipping. The skins are folded up compactly, flesh side out for protection, when almost dry, so they can be packed into shipping boxes without taking up much room. Skins thus handled will readily relax in the tanning process and are safe from becoming hair-slipped.
All swine animals (pigs, boars, warthogs, etc.) are to be packaged separately from the other trophy specimens. They may be in the same shipping box, but they must be individually wrapped so as not to come into contact with the other skins. Failure to do so will result in lost time of the entire shipment being held in quarantine plus additional and unnecessary dippings!
At this point, be sure all shipping tags are secured to all skins and horns. Don't forget to use corresponding tags for the skins and their horns, so as not to confuse them with other trophies of another hunter! Your Kudu horns should be going home with your Kudu cape! Please don't think this doesn't happen.
I can supply you with non-corrosive write-on “Impresso-Tags” for this type of identification. I can either number them for you, or you may number them in the field. Either way, these will give you double “control numbers” for cape and horns! A client of a fellow taxidermist brought back the entire skeleton of his trophy White Rhino, only to find out from the taxidermist he most likely had the bones of three separate rhinos… never mind that the thing had three different sets of foreleg bones!
Some Additional Helpful Hints
In climates where heat, dampness, and a greater danger of damage by vermin confront the collector, “boosting” the ordinary salting step can make a better job of preserving the hides. By mixing the salt with alum (aluminum sulphate) - in half and half ratios (2 lbs salt plus 2 lbs alum) - the drying ability of the salt will be nearly quadrupled! Virtually before your eyes, you will see the skin begin to puddle much of the liquids contained within, as it puckers and dries! This mixture is especially useful during the wet season!
No matter how carefully trophies are treated in tropical countries, they become utterly ruined if not packed and boxed properly for overseas shipping. To lessen the danger from attacks of insects, skins should not be boxed until ready to ship, and frequent examinations for insects should be made. Ask the outfitter, guide, or PH to provide the skins with a good insecticide. Many brands are in use for just this purpose.
Here is a list of Don'ts!
• Don't leave the care of the trophy until tomorrow
• Don't cut across throat or split it
• Don't use wire or tin tags for marking capes… they leave rust marks
• Don't dry skins in the sun or near fire
• Don't leave fat or meat on skins
• Don't leave trophies without corresponding tags on horns and capes
• Don't delay shipment
• Don't think taxidermists are miracle workers
As for taxidermists: we can fix a lot of damage… bullet holes are closed, torn ears are mended, and missing eyes can be replaced, but insect damaged areas - areas that are so badly chewed and eaten through - are a nightmare! There's much to be said for the poor appearance of large areas of missing hair that has “slipped” due to improper handling. Natural areas of hair rub are just that, natural… the epidermal layer is still intact. Some antelope, especially the older animals, have a tendency to “rub themselves raw” while relieving an itch. In these cases, at least the skin texture is still evident in the epidermis. Epidermal slippage however, leaves a smooth, slick area to the affected section of the skin. This requires much work to restore.
When it comes to foreign field care, it is the client who can make the difference between the beautiful trophy and the well-mounted trophy of a poor quality animal. I hope I have well armed you for your next Safari … wherever it takes you.
“Kwaheri!”
Last edited by a moderator: