A Martini Sporting Rifle

nztimb

AH ambassador
Joined
May 5, 2009
Messages
5,410
Reaction score
22,176
Media
1,632
Articles
6
Hunting reports
Australia/NZ
4
Hunted
New Zealand, Austaralia
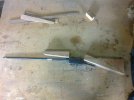
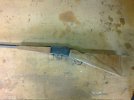
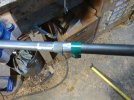
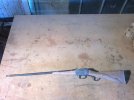
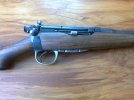
In times past the 303 was a very much used cartridge in Africa and I suspect that there are still many animals taken with this old cartridge every year. With the Martini also being in long use the Enfield version in 303 must have been taken to the game fields as well so I thought you might like to see a project I have just about finished.
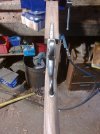
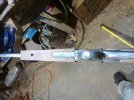
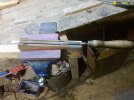
Initially I had been asked by a chap to make a pattern stock for a debridged Mk 3 Lee Enfield and I was intending to make a start on the pattern and was mulling it over when a good friend (Euan) rang to say his Martini had its 303 barrel installed so he would bring it down for a start on that was well. He bought a thumb drive (or some such little devise that pluged into the side of my computer) with a number of pics he had gathered on sporting martini's and by process of elimination and common concept we arrived at what he would like this little sporting martini to be like. His blank ad been a gift as the owner thought it was useless for anything but Euan had seen the potential and had squirriled it away for a special martini project.
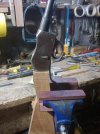
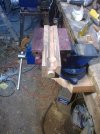
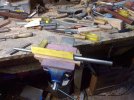
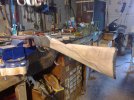
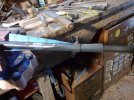
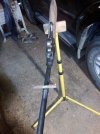
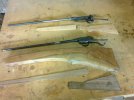
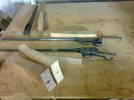
After lunch I made a start and laid out the pattern on his blank and one for the mk 3 pattern stock on a piece of rimu (a NZ native wood), got them cut out and the bolt holes drilled which was enough for the first day


Attachments

  • Photo2350_zpsrswxvxon.jpg
    Photo2350_zpsrswxvxon.jpg
    192.8 KB · Views: 200
  • Photo2348_zpsfgilxdhh.jpg
    Photo2348_zpsfgilxdhh.jpg
    202.4 KB · Views: 239
  • Photo2351_zpsc6h8ofuw.jpg
    Photo2351_zpsc6h8ofuw.jpg
    204.2 KB · Views: 157
Last edited by a moderator:
With the headless bolt in place a start can be made


With the headless bolt down the bolt hole the socket dimensions can be marked on the face of the stock then a free handed interior line marked round so the process can start.


Smoking it down into position.


It can then be bolted up to check for tight fit against the face of the socket and the socket edges


The forestock is started by marking out and cutting the action stub


And the roughing out can start.


Attachments

  • Photo2378_zpsdrzylkcd.jpg
    Photo2378_zpsdrzylkcd.jpg
    202.9 KB · Views: 176
  • Photo2376_zpsbp1qmhbz.jpg
    Photo2376_zpsbp1qmhbz.jpg
    270.3 KB · Views: 154
  • Photo2374_zpskyky4oic.jpg
    Photo2374_zpskyky4oic.jpg
    201.2 KB · Views: 158
  • Photo2373_zpsnatylbdq.jpg
    Photo2373_zpsnatylbdq.jpg
    251.1 KB · Views: 183
  • Photo2375_zpsqphmfjpf.jpg
    Photo2375_zpsqphmfjpf.jpg
    272.7 KB · Views: 130
  • Photo2379_zpspdn4s8kd.jpg
    Photo2379_zpspdn4s8kd.jpg
    281.4 KB · Views: 151
Last edited by a moderator:
I had other things to do for the last few days but got back to it today and had a reasonable result.
Finished off the forestock barrel channel

Then the forestock latch needed seeing to


Attachments

  • Photo2388_zps1kydtpgt.jpg
    Photo2388_zps1kydtpgt.jpg
    263.4 KB · Views: 156
  • Photo2389_zpszr98lgie.jpg
    Photo2389_zpszr98lgie.jpg
    260.6 KB · Views: 170
  • Photo2387_zpsmnwk4dmi.jpg
    Photo2387_zpsmnwk4dmi.jpg
    271.4 KB · Views: 210
Last edited by a moderator:
I put it together just to see how it looked

Then it was the turn of the butt plate so it got marked out and the beak inlet


Then some thickness was planed off the butt stock to make less material to be removed when getting the plate fitted


I forgot to take a pic when I did it but the lever cup was fitted when the butt stock was still in the square


And then the start of some shaping began but the day had been long enough that a rudimentary shape was all I got it to.
 

Attachments

  • Photo2396_zpsydbt4gvq.jpg
    Photo2396_zpsydbt4gvq.jpg
    269.1 KB · Views: 166
  • Photo2392_zpsqi0dzrhk.jpg
    Photo2392_zpsqi0dzrhk.jpg
    239.6 KB · Views: 198
  • Photo2394_zpsnobafsxz.jpg
    Photo2394_zpsnobafsxz.jpg
    233.6 KB · Views: 210
  • Photo2391_zpswn8o5bho.jpg
    Photo2391_zpswn8o5bho.jpg
    211.1 KB · Views: 167
  • Photo2395_zpsyc3kdgct.jpg
    Photo2395_zpsyc3kdgct.jpg
    265.8 KB · Views: 160
Last edited by a moderator:
The first chore today was to fit the barrel band attachment for the forestock and as it was smaller in inside diameter than needed to get as far up the barrel as the forestock dimensions required. A piece of 220 grit wet and dry was wrapped around the barrel with the band over it and by working it back and forward and having many tries I was able to increase the I D.


Still a way to go as I wanted it to cover the main pin hole for the original rear sight . ( this is a good take-off smle barrel) The cross barrel pin hole can have a pin driven in and dressed off later on.


Having marked where it was to go to on the barrel and transferred the marking to the forestock it was time to remove a little wood
 

Attachments

  • Photo2407_zpscvbgc6de.jpg
    Photo2407_zpscvbgc6de.jpg
    262.2 KB · Views: 190
  • Photo2405_zpsmixy2drg.jpg
    Photo2405_zpsmixy2drg.jpg
    277.4 KB · Views: 155
  • Photo2406_zps8hl6rdmf.jpg
    Photo2406_zps8hl6rdmf.jpg
    263.7 KB · Views: 168
Last edited by a moderator:
With the band fitting into the forestock I could drive it onto the barrel. A good clean and a light smear of Imperial sixing wax was enough to help get it up to the desired point where it is a very tight no slip fit. It took a little to drive it the last 1/2 mm but a brass block and going round the band got it sorted. Of course I did set a level on the action bottom to get it right in the vise and then checked the bottom of the band nut to make sure as I went forward.

The machine screw that had been with it needed a little shortening and the back of the head re-shaped to mate with the counter bore in the forestock but eventually it all came together.

Then the excess width was bandsawn off
 

Attachments

  • Photo2409_zps8edrsuz6.jpg
    Photo2409_zps8edrsuz6.jpg
    242.4 KB · Views: 131
  • Photo2410_zpswooclz74.jpg
    Photo2410_zpswooclz74.jpg
    260.8 KB · Views: 140
  • Photo2408_zps4mzhz3h3.jpg
    Photo2408_zps4mzhz3h3.jpg
    261 KB · Views: 173
Last edited by a moderator:
The rest of the day was taken up with shaping the forestock


And finishing the butt stock shaping, with it all sanded to 100 grit


At this stage it will wait till Euan can have a check fit as the brief was to make this a slim trim sporter and putting it on the scales it tips them at 6 lb 1 oz with the only addition to be a set of open sights and a barrel band sling eye (half way between the forend tip and the muzzle) so it will probably not go over about 6 lb 3 or 4 when finished. The grain in this one is quite spectacular as the full fiddle back in the forestock runs back down the wrist of the butstock where it reduces and straightens into the dark and light pattern. With some alkanet and oil it will be quite striking. I have a piece of buffalo horn that should be just right to add a little to this rifle and will talk it over with him when he gets here
 

Attachments

  • Photo2412_zpsqqcfowwq.jpg
    Photo2412_zpsqqcfowwq.jpg
    199.9 KB · Views: 148
  • Photo2411_zpsncpdfxgi.jpg
    Photo2411_zpsncpdfxgi.jpg
    277.2 KB · Views: 177
Been a great day as Euan came down for a yarn and to check the martini. We discussed the buffalo horn tip (among many other subjects ) and it was decided that the forestock will have the tip cut off and the buff horn fitted as this will give it the classic English sporting rifle look.

This was one of the many pics that were part of the brief for the rifle with the one change I suggested being that rather than having the flutes at the wrist, I lengthened the wrist so that the flutes were not necessary and in my eyes it complemented the light rifle aspect. Check the end of the lever on the sample pic where it ends up behind the comb nose. I made it end in conjunction with the comb nose.

.
 

Attachments

  • Martini sporter_zpsslnhpwlp.png
    Martini sporter_zpsslnhpwlp.png
    467.7 KB · Views: 160
  • Photo2418_zpsmhxkycxe.jpg
    Photo2418_zpsmhxkycxe.jpg
    218 KB · Views: 135
Last edited:
The other nice thing that happen was that Euan bought down an original fish belly 5 shot magazine that we had traded for.
These are as scarce as hens teeth and very expensive when they do turn up so I was all the more pleased to have this nice example. It has finished my Lee Speed styled rifle to the stage I had seen it when I started the project some time back.


Attachments

  • Photo2414_zpsgieyneye.jpg
    Photo2414_zpsgieyneye.jpg
    262.5 KB · Views: 177
  • Photo2415_zpsuweqxy52.jpg
    Photo2415_zpsuweqxy52.jpg
    236.1 KB · Views: 170
  • Photo2417_zpsw1stcjjw.jpg
    Photo2417_zpsw1stcjjw.jpg
    216.4 KB · Views: 153
  • Photo2416_zpsajsd1pne.jpg
    Photo2416_zpsajsd1pne.jpg
    194.2 KB · Views: 183
Last edited by a moderator:
Nothing quite like cutting the end off a fully shaped forestock to add the tip for making you very carefull of measurements etc


Normally I have three brass dowels to hold the tip on but this forestock is so slim that I only really had room for two. The 1/8 in brass dowels are bruised with a set of end nippers to make them a bit more grippy and the epoxy is mixed with a touch of black concrete die to match the the horn tip after it is polished just in case there is any imperfections in the mating surfaces


All clamped up where it will sit for a couple of days while I do other "stuff".
 

Attachments

  • Photo2422_zpsatqt4ryk.jpg
    Photo2422_zpsatqt4ryk.jpg
    259.3 KB · Views: 146
  • Photo2425_zpspghldj0y.jpg
    Photo2425_zpspghldj0y.jpg
    231.8 KB · Views: 134
  • Photo2423_zpsnmirowfz.jpg
    Photo2423_zpsnmirowfz.jpg
    203.6 KB · Views: 180
Last edited by a moderator:
A few hours this morning had the raw horn shaped back to where the old tip had been


With tape around the end of the file I can make sure that I am keeping things from getting down past the original bed. The file is tapered toward the end so taping it back to the same dia as the main part makes sure that the cutting stops as the new channel approaches the depth of the existing. I keep the taped end in the barrel channel but had to sit it like this so it would balance for the pic.


So back to a 150grit finish at this stage.


Attachments

  • Photo2434_zpsrrxgby52.jpg
    Photo2434_zpsrrxgby52.jpg
    248.5 KB · Views: 143
  • Photo2432_zpsy64vesyq.jpg
    Photo2432_zpsy64vesyq.jpg
    231.7 KB · Views: 146
  • Photo2435_zps1nlzlikx.jpg
    Photo2435_zps1nlzlikx.jpg
    286.7 KB · Views: 152
Today.
A progress report sees it having been sanded to 360, wetted and re-sanded then repeated twice with 600grt paper. After that it has had a couple of applications of alkanet root oil and is sitting drying for now. It will be finished off over the next week or two.
 
Thanks for the pictures, it's absolutely stunning, great job.
 
Wow very cool and you are very talented. Stock making seems like a difficult process and you work is very good.
 
You do very nice work sir. I'm looking forward to seeing the finished rifle.
 
Very nice work. Excellent description of the process. Thank-you!
 
Thanks for showing us the whole process, and looking forward to seeing the finished rifle.
 
You have golden hands Von Gruff.
I envy you.
Excellent pictures of documentation.
I like it. Congrats.
Witold
 
Thanks guys. These are great actions to work with and make nice light rifles for stalking.
 

Forum statistics

Threads
53,992
Messages
1,142,587
Members
93,367
Latest member
ChadwickTo


Latest posts

Latest profile posts

Looking to hire Odoo developers in UAE, USA In o2b technologies has skilled and experienced Odoo developers at competitive pricing Consult Now!

Cwoody wrote on Woodcarver's profile.
Shot me email if Beretta 28 ga DU is available
Thank you
Pancho wrote on Safari Dave's profile.
Enjoyed reading your post again. Believe this is the 3rd time. I am scheduled to hunt w/ Legadema in Sep. Really looking forward to it.
check out our Buff hunt deal!
Because of some clients having to move their dates I have 2 prime time slots open if anyone is interested to do a hunt
5-15 May
or 5-15 June is open!
shoot me a message for a good deal!
 
Top